12 Days Christmas Tree (My Personal Favorite!)
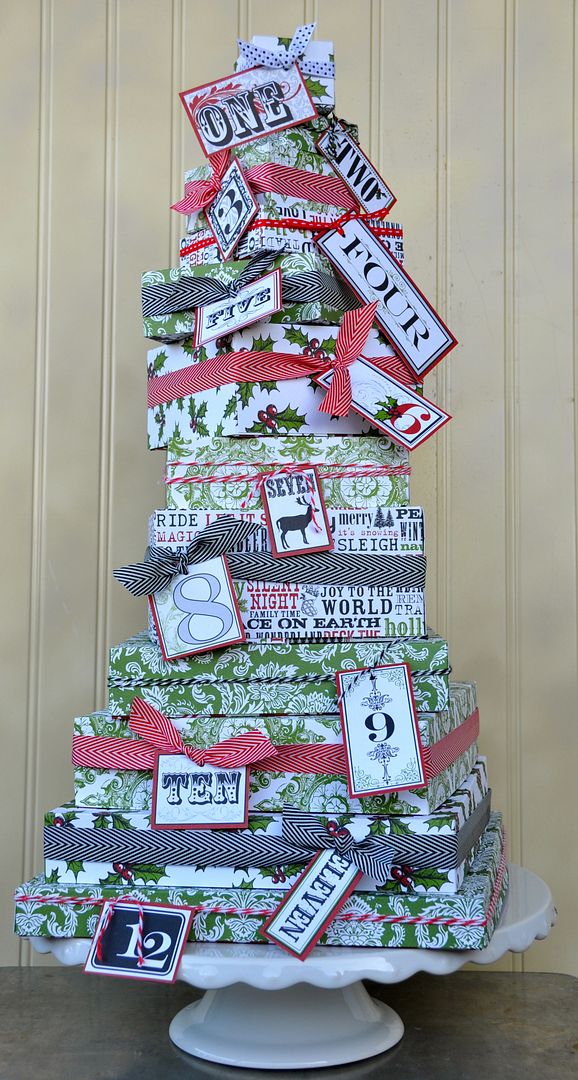 |
I love the this large countdown which doubles as an easy centerpiece! Each box is easily handmade with your own patterned paper. Treats and activities or a special gift can be placed in each box to be opened throughout December. 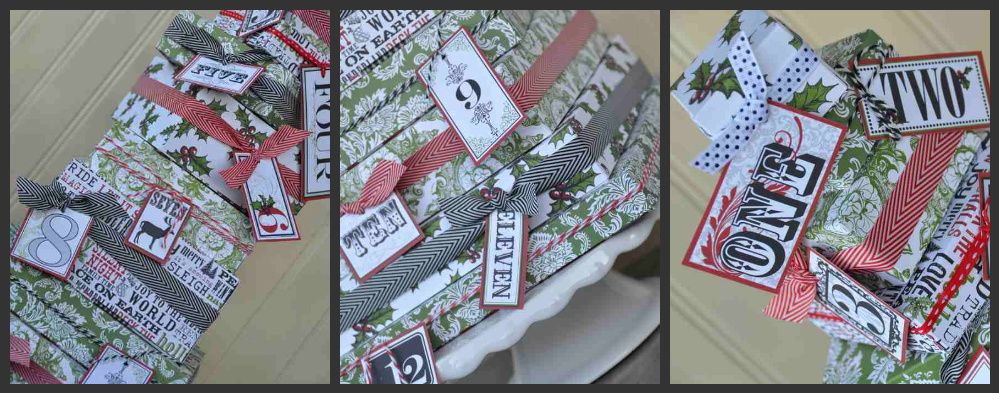 |
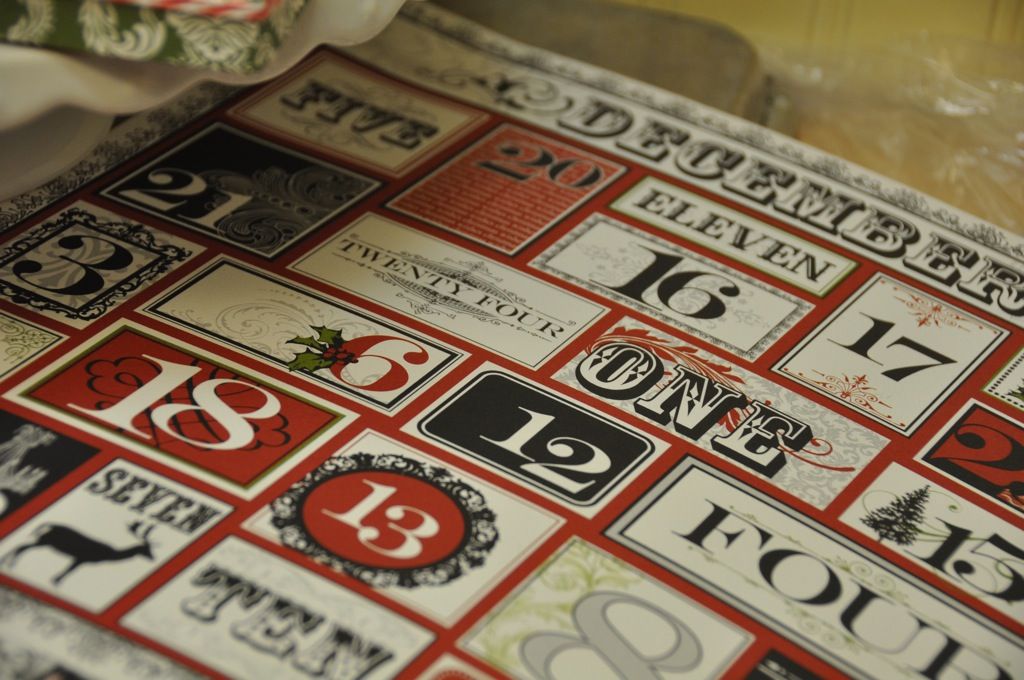
To create the 12 Days Christmas Tree, you will need 20 sheets of heavyweight patterned paper. I used the Teresa Collins Christmas Home Collection. I love the colors, the designs and the overall feel of this line. Use your favorite line to customize your tree. You will also need ribbons and number tags (mine came from a sheet of the Christmas Home Collection paper).
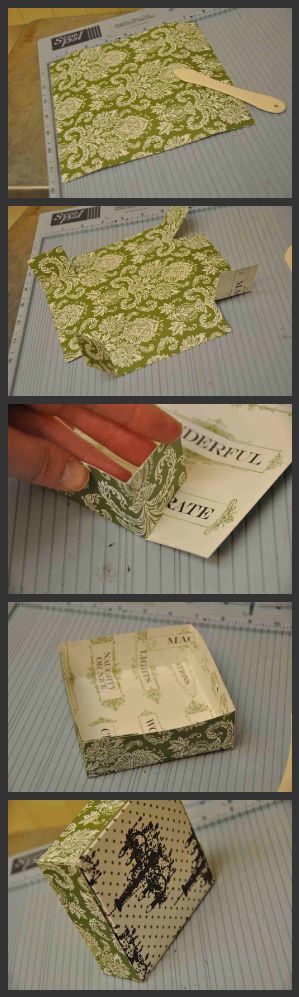 Create a top and bottom for each box:
1. Cut and score two papers for each box (top and bottom) according to the dimensions below. Score each side of each page and then turn and score the next side until all sides are scored and the scores in the corners overlap.
2. Cut one side of fold in each corner to create a flap in each edge.
3. Fold flap in and apply adhesive so that the flap will adhere its adjoining side.
4. continue until all four sides are complete and you have a box.
5. Place one box inside another for top and bottom.
Box Dimensions
12th Day- Cut to 12X12, Score each side at 1"
11th Day- Cut to 12X12, Score each side at 1 1/2"
10th Day- Cut to 12X12, Score each side at 2"
9th Day- Cut to 10.5X10.5, Score each side at 1 1/2"
8th Day- Cut to 12X12, Score each side at 3"
7th Day- Cut to 8.5X8.5, Score each side at 1 1/2"
6th Day- Cut to 10X10, Score each side at 2 1/2"
5th Day- Cut to 7.5X7.5, Score each side at 1 1/2"
4th Day- Cut to 6x6, Score each side at 1"
3rd Day- Cut to 6X6, Score each side at 1 1/2"
2nd Day Day- Cut to 5X5, Score each side at 1 1/2"
1st Day- Cut to 4.5X4.5, Score each side at 1"
Once all boxes are assembled, fill with gifts, activities or treats and stack on a cake plate for display. Decorate your boxes with ribbon and numbers as desired. My numbers came from a pre-designed sheet by Teresa Collins. I simply cut around each number and punched a hole in it to tie my ribbon through. So simple!
Vintage Santa Flip
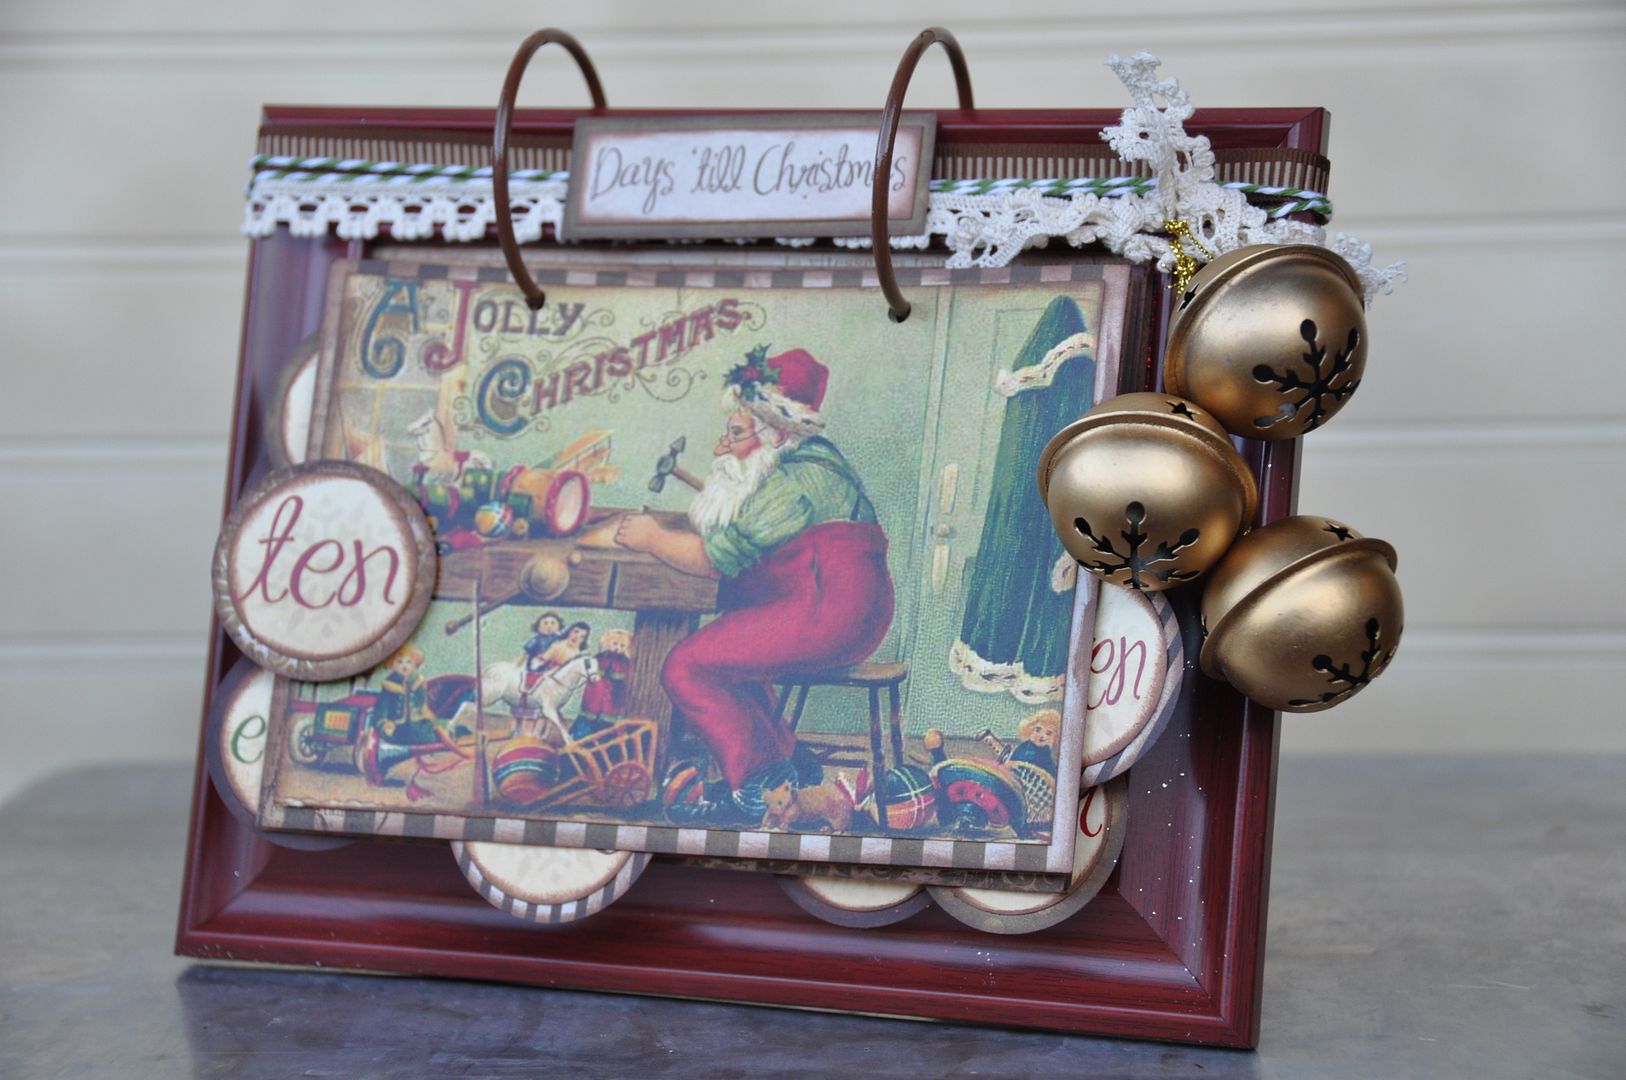 |
| Remember the fun Flip Countdown from Halloween? Well here is a vintage Santa version of the easy to create advent. This makes a great early gift for friends and neighbors! To make a vintage flip calendar, you will need: a 5X7 frame (I got mine at the dollar store), two 3" binder rings, the Vintage Santa Download, paper for backing, decorative elements, adhesive, hole punch, ink pad. *I used an inkpad to distress all of the pieces in my countdown. Just rub an inkpad along each edge to create a darkened, finished edge.* 1. Print the Vintage Santa Download on cardstock. Cut out each image and use a 1 1/2" circle punch to cut out numbers (You can also free hand cut if you don't have the punch). 2. Cut backing paper slightly larger than printouts and adhere printouts to backer. Use a 1 3/4" circle punch to punch backers for the numbers. Adhere the numbers to the images as desired. 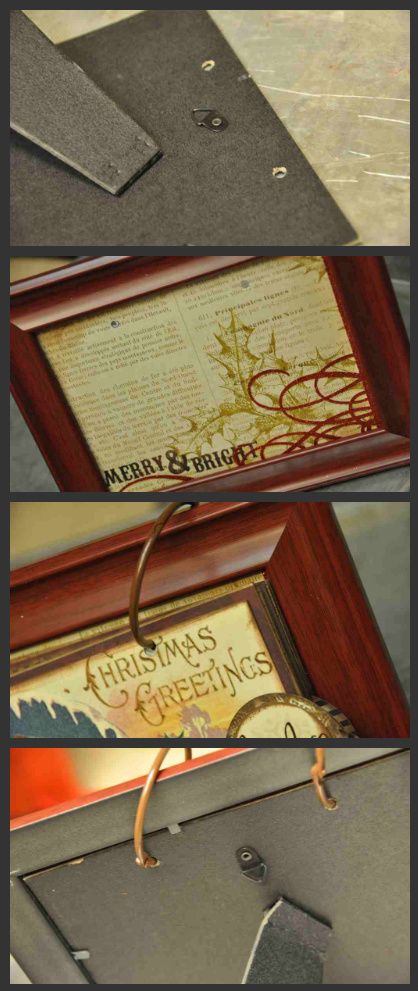 3.Remove the glass and backing from your frame. Punch two holes in the cardboard backing. You want the holes to be as close to the edge of the frame as possible. 4. Place a 5X7 patterned paper in frame with backing and punch holes through paper. 5. Trace holes onto each of the Santa images and punch. 6. Place rings through images and then through frame backing. 7. Decorate frame as desired with ribbons, bells and embellishments. |
Magnetic Tin Calendar
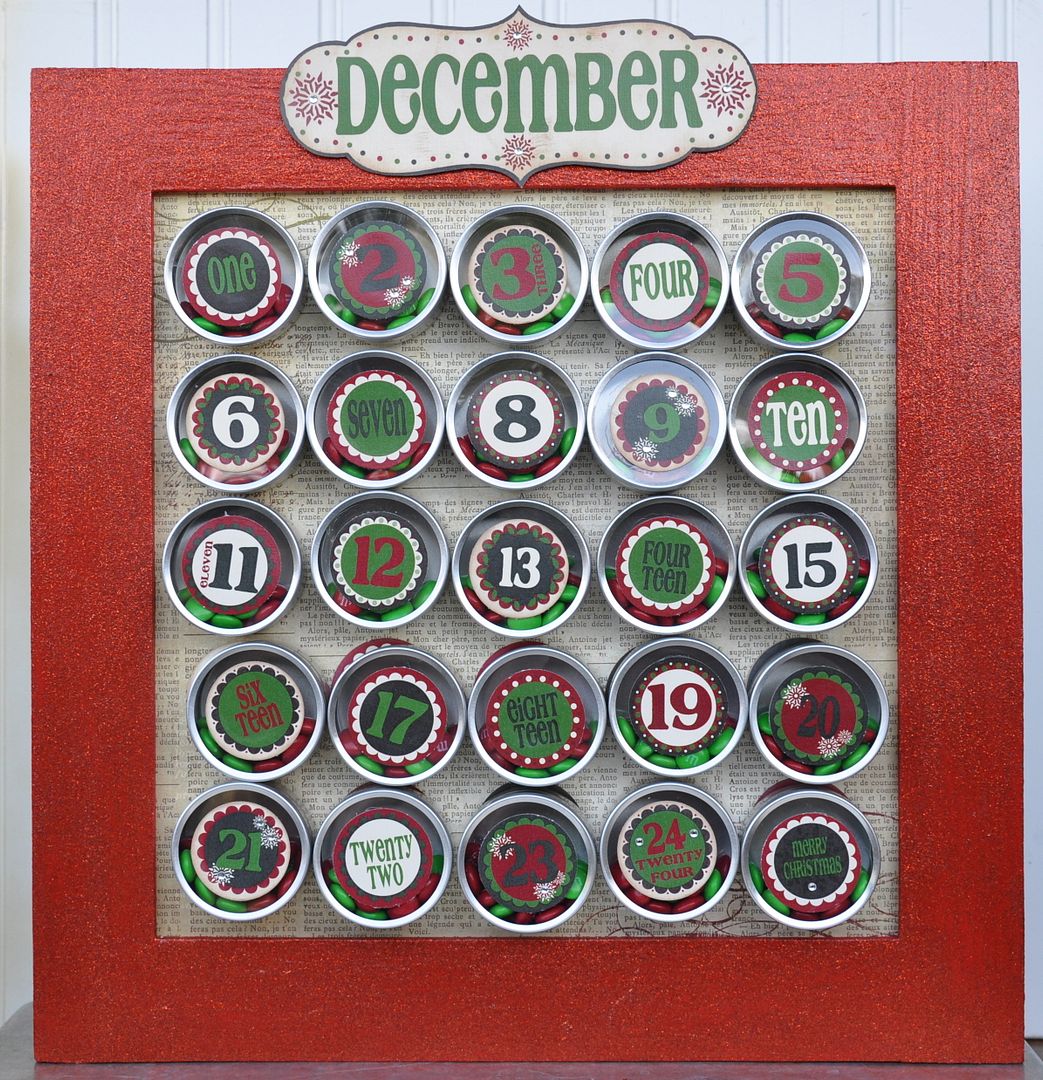 |
It's easy to see how counting down with this magnetic calendar would be a favorite holiday tradition.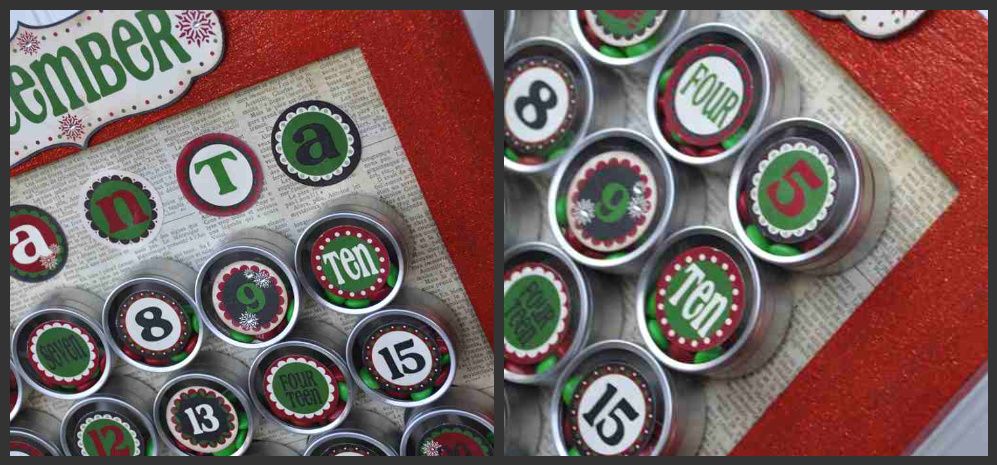 |
To create this magnetic treat board, you will need: 12X12 wood frame painted as desired (I used the Martha Stewart glitter paint on top of a coat of red paint to create the glitter finish), 25 favor tins (I purchased mine in the wedding section at Michaels), 25 magnets and adhesive (i use E6000 to adhere my magnets), the Christmas Countdown Numbers Download, 12x12 pattern paper for backing, 12X12 galvanized steel (I got mine from Heartland Paper for $5.99), additional embellishments as desired. *1 1/2" and 1 3/4" circle punches make this project much easier.
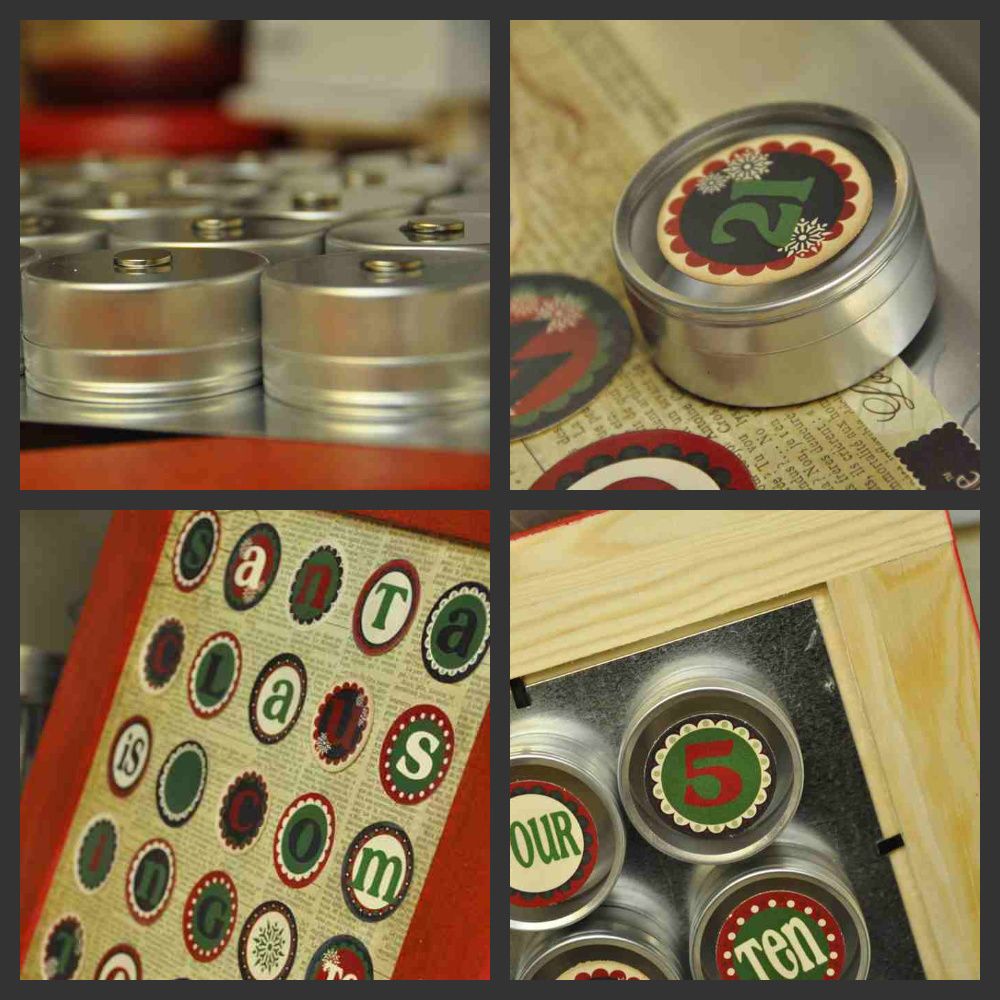
1. Adhere a magnet to the back of each favor tin using a strong adhesive. Allow to dry well.
2. Print out the Christmas Countdown Numbers Download on cardstock and cut out using circle punches or free hand. (Numbers should be 1 1/2", Letters should be 1 3/4"). Cut the December title out along the brown line.
3. Ink pieces as desired with ink pad.
4. Place magnet board and 12X12 patterned paper in frame.
5. Adhere the "SANTA CLAUS IS COMING TO TOWN" letters to 12X12 paper so that they will fit directly under tins.
6. Adhere numbers to the top of each tin.
7. Decorate as desired with bling or other embellishments.
8. Fill tins and then open one tin each day until Christmas! *empty tins can be stored on the back of the frame so that the message is revealed each day.
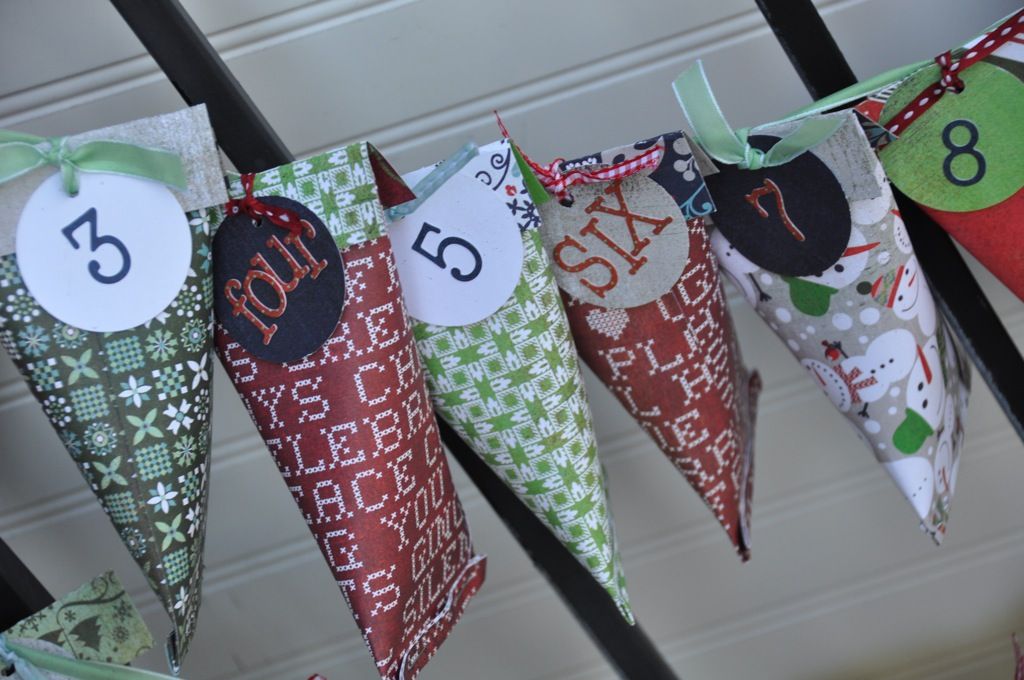
Matchbox Sliders
Slide into Christmas with this fun vertical advent. Small matchbox style boxes hold treats to be enjoyed each day until Christmas.
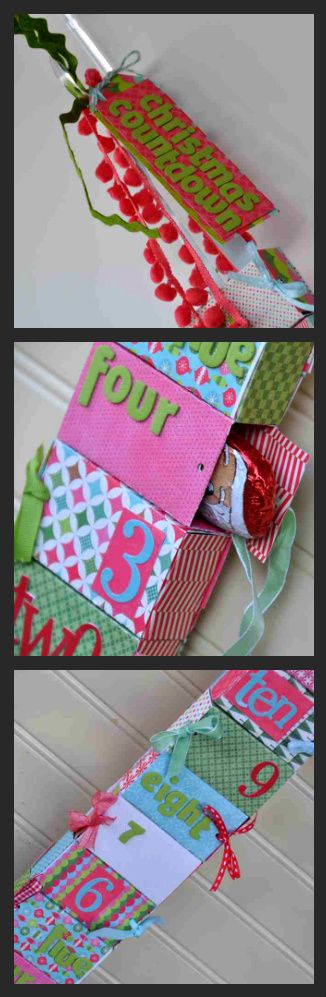
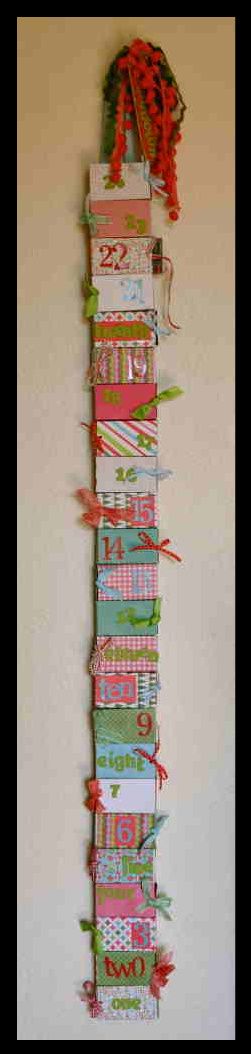
This little matchbox hanger is perfect for those skinny little spaces that need a little holiday flair.
To create this countdown, you will need: 24 sheets of 12X12 patterned paper, 24 1.75x6" strips, letter/number stickers, ribbon, scoring tool, hole punch, strong adhesive (I used scor tape) embellishments as desired.
1. Fold each 6X6 piece of paper in half and score at 1.25, 2.25, 4 and 5
2. Scor each 1.75X6 strip at 1", 2" and 5"
3. Fold pieces on scor lines.
4. Apply adhesive to edge of strip that only has one fold.
5. Adhere to inside of box along the raw edge(not the folded edge)
6. Fold box closed (slip one side in the pocket of the other side) with strip going inside the box.
7. Staple box seam shut. *At this point you should have one closed end and one open end with a flap
8. punch a small hole in the flap and top of box, thread ribbon through.
9. Add a treat in each box and then tie shut.
10. Adhere boxes together using strong adhesive (I used scor tape!)
11. Adhere ribbon to the back of boxes.
12. Secure back of boxes with strips of 12X12 paper to add a little support and hide the seams and staples.
13. Add number stickers and letters as desired.
14. Add a label tag and additional ribbon at the top for a little more color and flair.
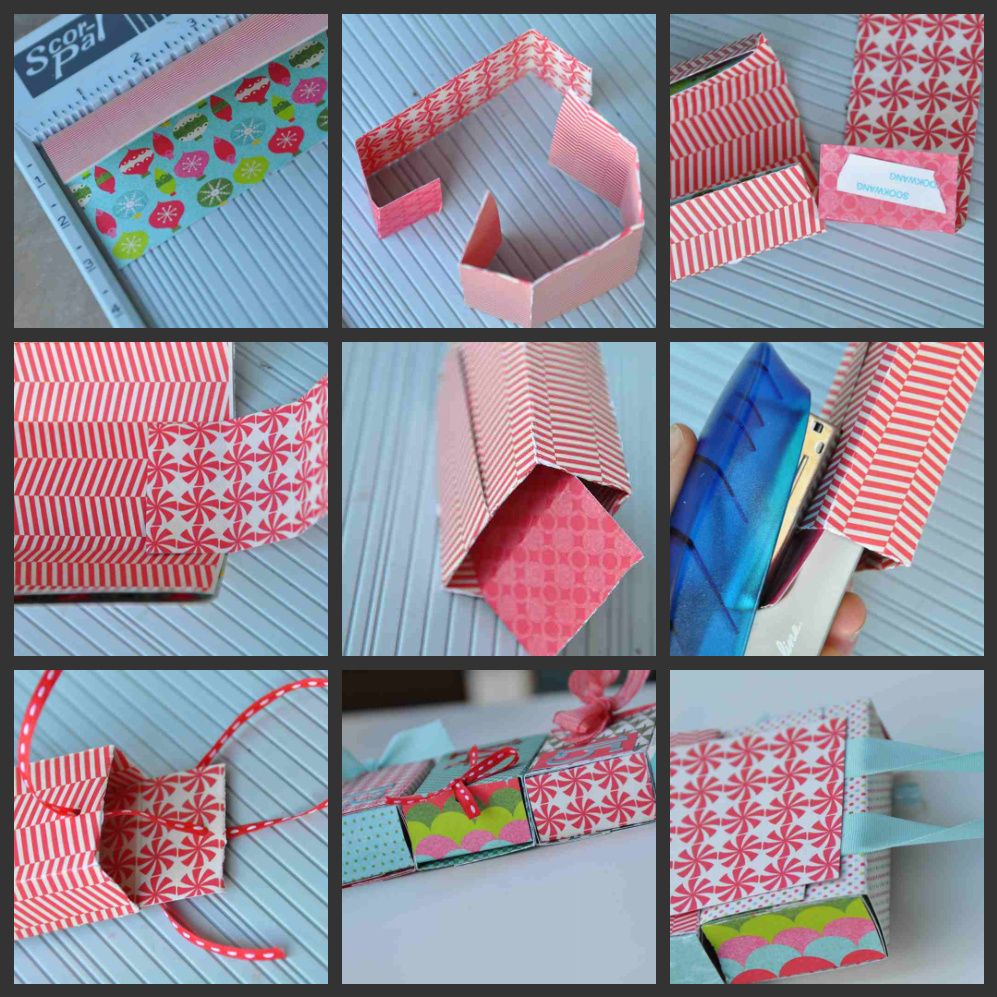
Candy Pouch Countdown
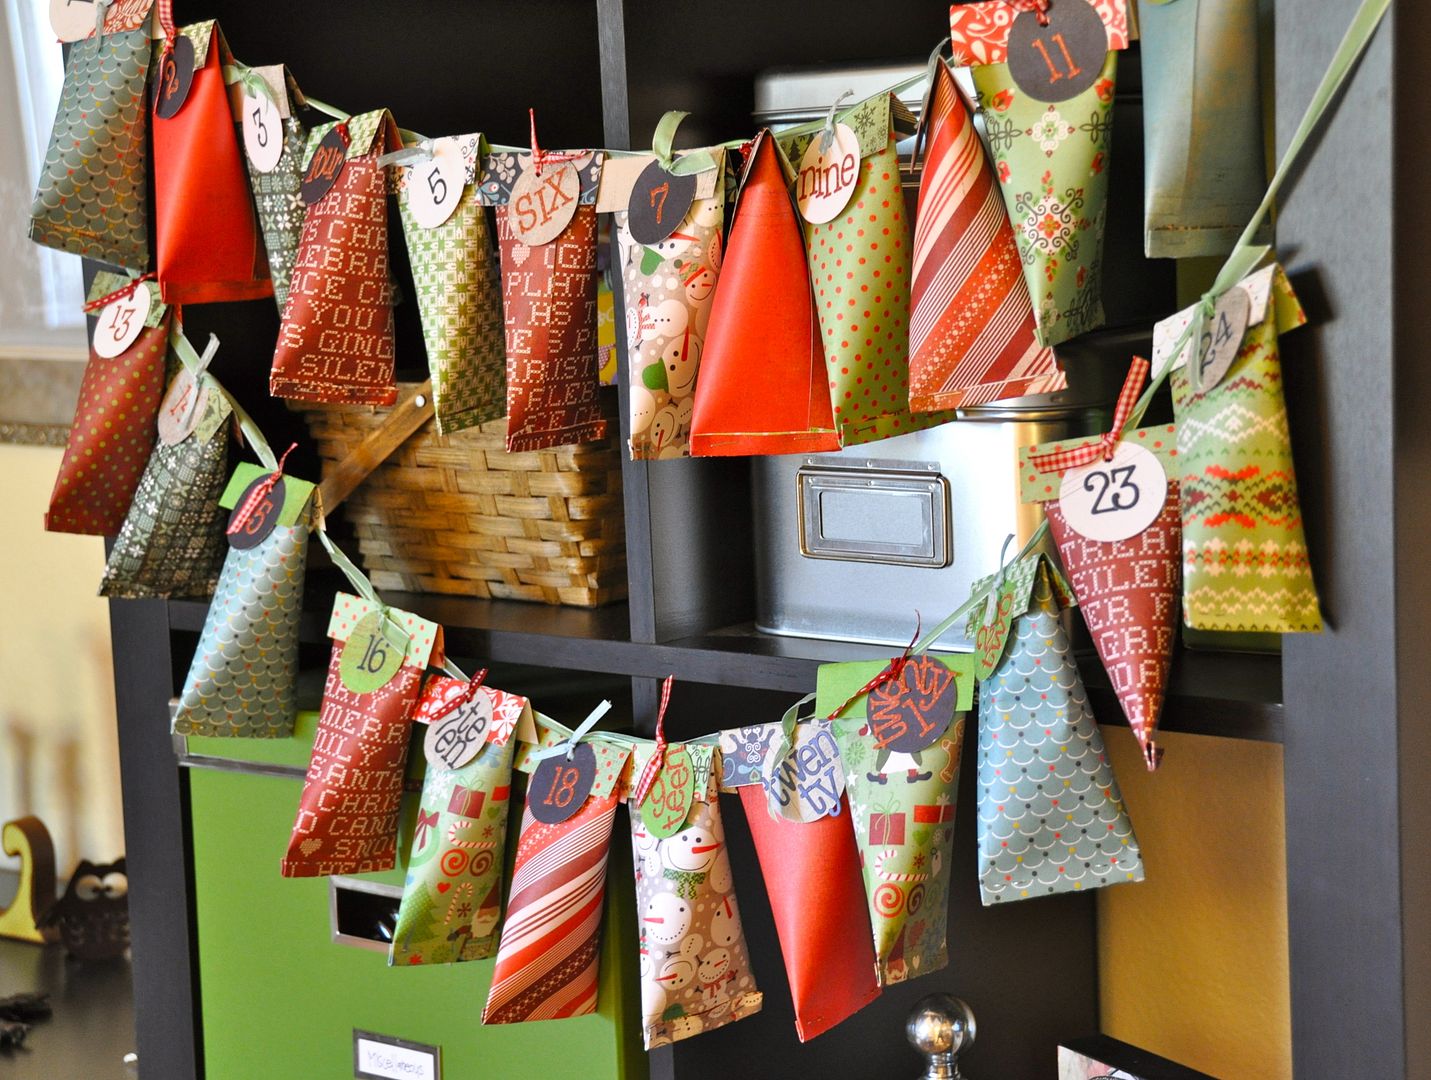
This versatile banner can hang from a mantle, shelf, doorway or railing. Let your kiddies countdown to Christmas by opening a treat pouch each day until Santa arrives!
To create this banner, you will need: 24 6X6 pieces of paper (I used Basic Grey's Nordic Holiday), 24 2X3" pieces of patterned paper, number tags (I made mine with a 1 1/2" circle punch and letter stickers), ribbon, hole punch, adhesive
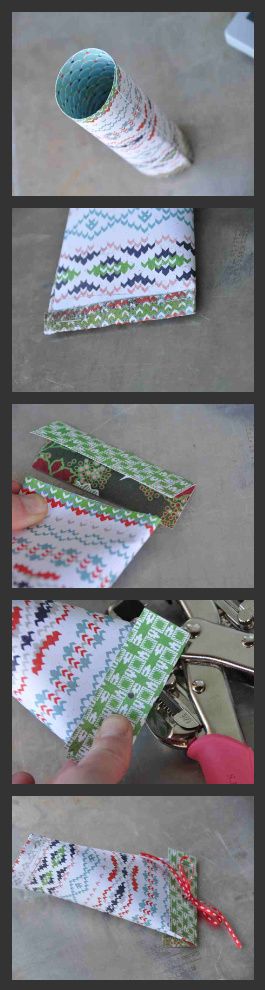
To make each pouch:
1. Adhere two edges of 6X6 paper together to create a tube.
2. Fold over one edge of tube and staple shut, add a treat or note.
3. Fold open edge in opposite direction as stapled edge. Fold 2X3 paper in half and place on top edge like a cuff.
4. Punch a hole through top edge and paper cuff and tie shut with a ribbon.
5. Add tags and string onto banner ribbon. You can also place these in a basket if you don't want to string the banner.
With five fun ideas, it is just tough to decide which one to create! Luckily, you have plenty of days before December begins. I hope you enjoy crafting up Christmas with these unique calendars. Have a Happy Holiday!
No comments:
Post a Comment