Showing posts with label Kits. Show all posts

Saturday, December 10, 2011

2012 Calendar Pages

I have had a few requests to update the calendar that will fit in this kit from last year.  If you purchased this kit and would like a new 2012 calendar, you can purchase and download it now! The 2012 calendar will fit perfectly into the same spot as the 2012. Just print it on white cardstock, trim the edges, and you are all set.
2012 Calendar File $3.00
(file will be emailed to you within 24 hours)


2012 Calendar Pages

I have had a few requests to update the calendar that will fit in this kit from last year.  If you purchased this kit and would like a new 2012 calendar, you can purchase and download it now! The 2012 calendar will fit perfectly into the same spot as the 2012. Just print it on white cardstock, trim the edges, and you are all set.
2012 Calendar File $3.00
(file will be emailed to you within 24 hours)


Friday, October 21, 2011

I LOVE FRANKIE SALE

We are now exactly 10 spooky days from HALLOWEEN!!  I have a few "I LOVE FRANKIE" kits left, so I thought I would offer my last few for a SUPER DEAL.  If you have been looking at Frankie, but haven't snagged yours yet, now is your chance to get him for just
$15 with FREE SHIPPING to any US location!!
(regularly $22)


Kits ship out within 24 hours so you could easily have yours up and ready for display by October 31st. Deal is good until the kits disappear!


I LOVE FRANKIE SALE

We are now exactly 10 spooky days from HALLOWEEN!!  I have a few "I LOVE FRANKIE" kits left, so I thought I would offer my last few for a SUPER DEAL.  If you have been looking at Frankie, but haven't snagged yours yet, now is your chance to get him for just
$15 with FREE SHIPPING to any US location!!
(regularly $22)


Kits ship out within 24 hours so you could easily have yours up and ready for display by October 31st. Deal is good until the kits disappear!


Tuesday, October 4, 2011

Countdown to Halloween on Studio 5

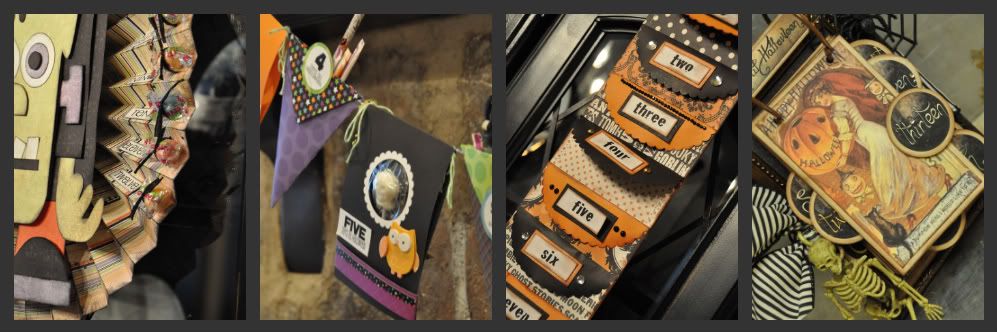
It's that time once again to COUNTDOWN TO HALLOWEEN!  You may be thinking, aren't you a week late to start counting down October? Well, this year, I decided to switch things up a bit and countdown 13 spooky days to the ghoulish holiday. By doing the unlucky 13 days, you aren't counting down a full 31, which gets a little bit long for the little ones. And, the best part is, you don't have to start counting down until October 18th, so you have plenty of time to complete these projects.

This year, I created 5 different countdowns that are sure to bring the spirit of Halloween straight into your home.  I hope you enjoy the patterns and instructions below.

MAD ABOUT ENVELOPES-
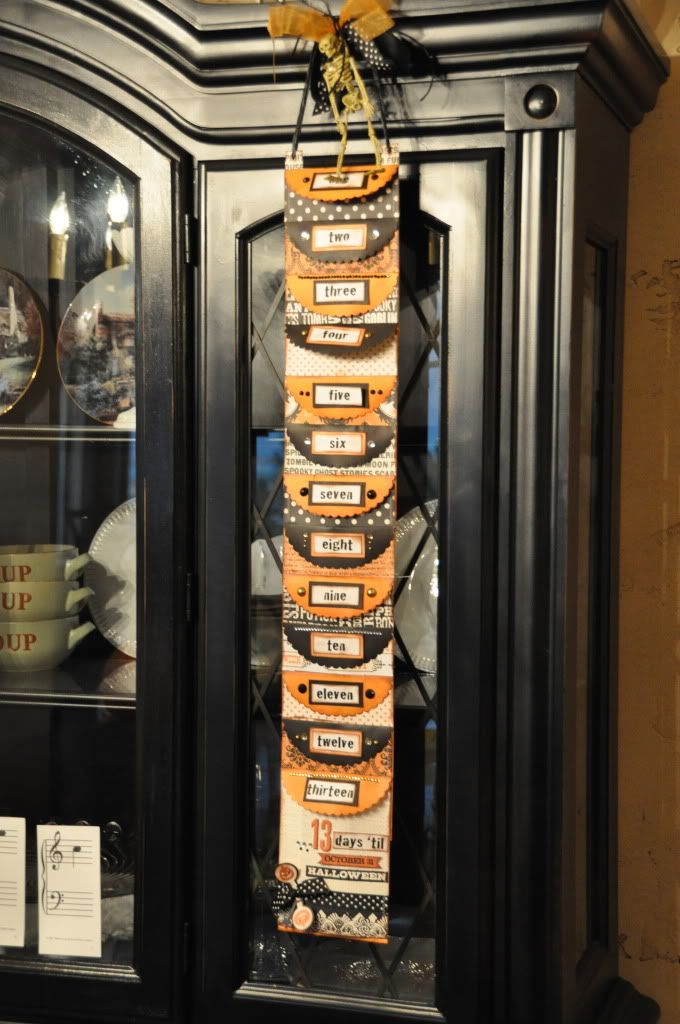
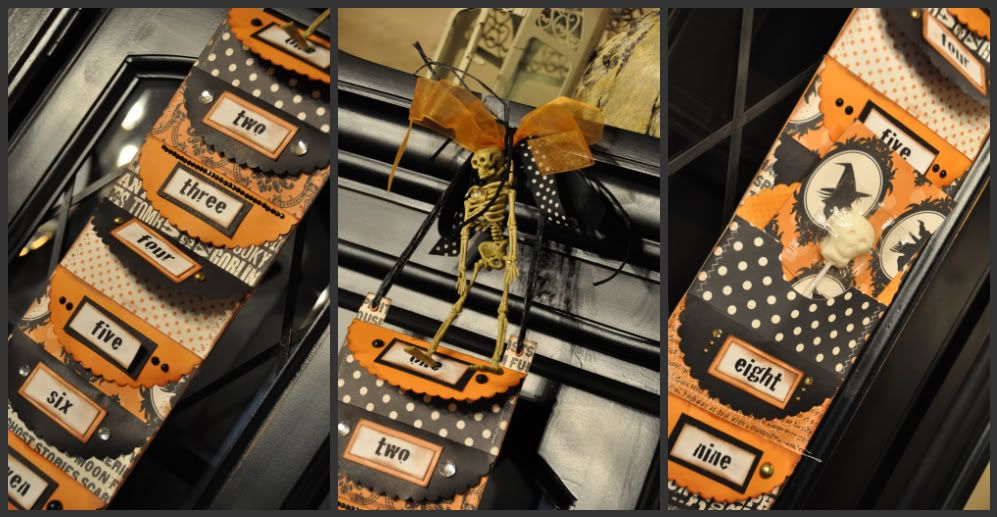
I created this haunted countdown using the new black and orange envelopes from Doodlebug Design. I love these envelopes because they are the perfect colors and they have an adorable rounded scallop flap that really adds to the countdown.  Although these envelopes were perfect for my creation, you can use any envelope that has a top flap.  To embellish the envelopes I used pattern paper and embellishments from Teresa Collins' Haunted Hallows line.

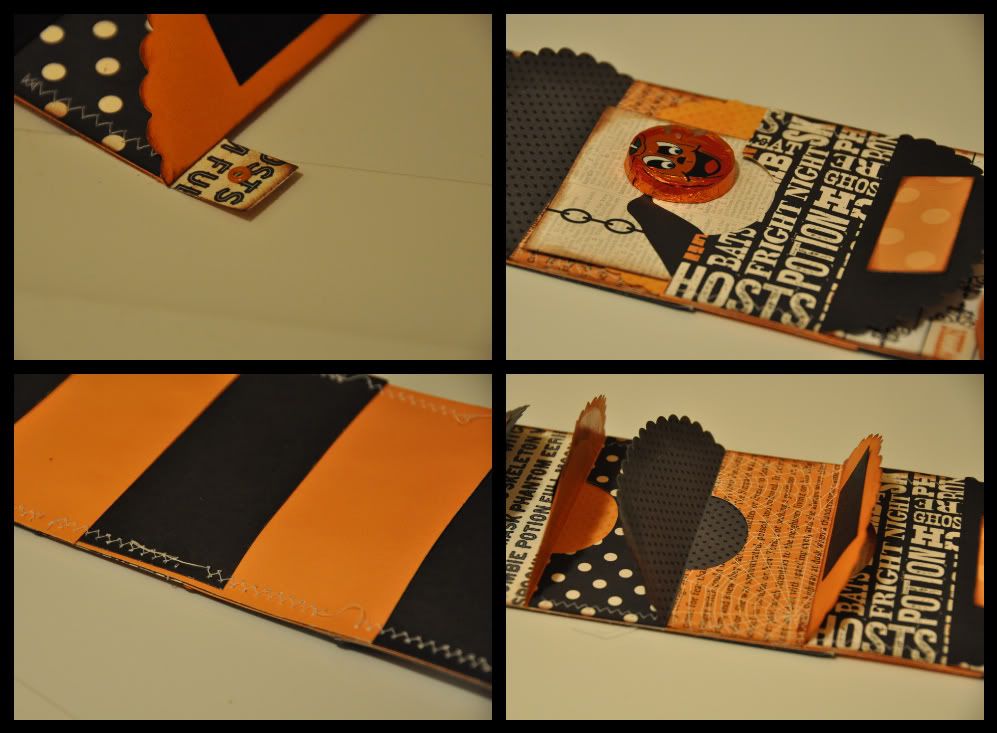
I adhered patterned paper to the front of each envelope and then attached envelopes together so that flaps were open and easy to access. To reinforce the adhesive, I sewed along the edges of the envelopes, being careful not to sew the flaps closed.  (If you don't have access to a sewing machine, you can add a few staples along the edge).  For a fun decorative look, you can sew or staple strips of folded ribbon into the edges as well.

PENNANT POCKETS AND SUCKER FLIP BANNER-


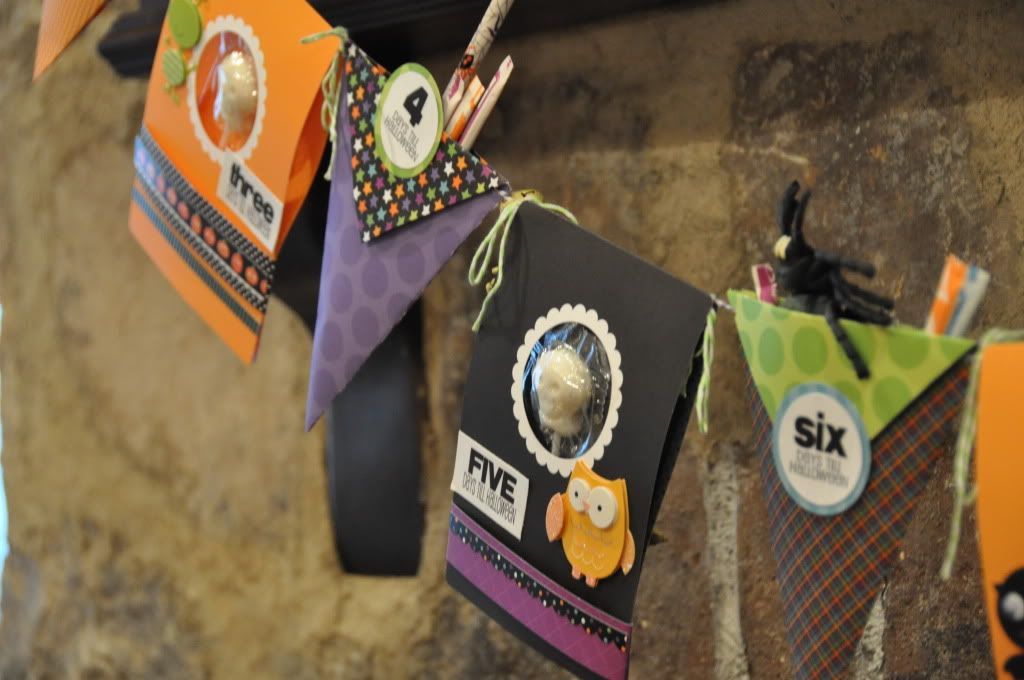
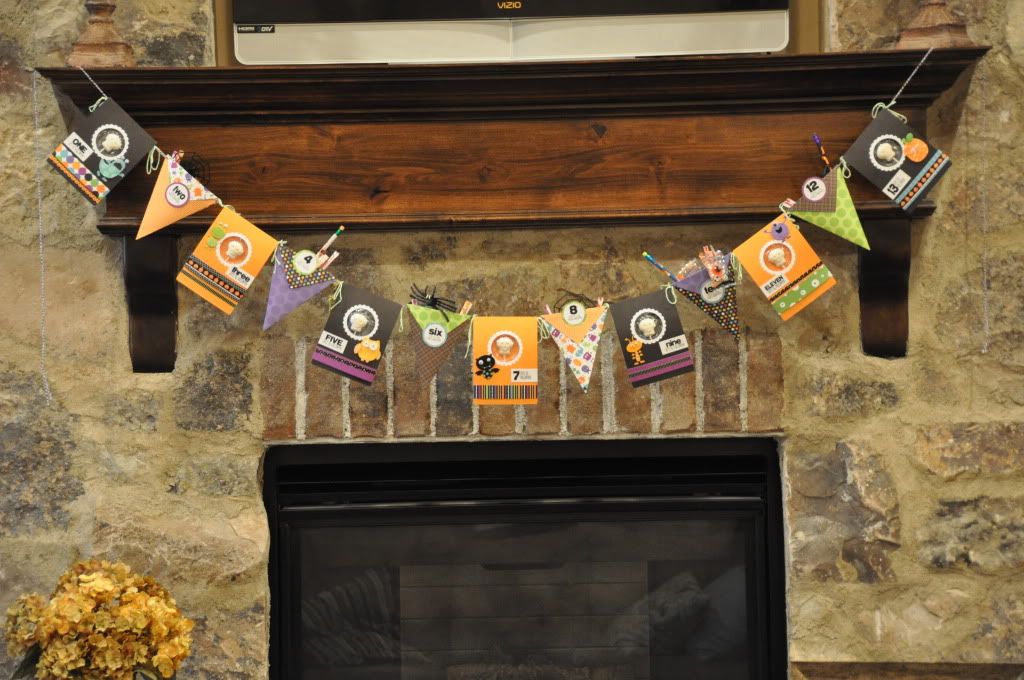
I am obviously loving the Doodlebug Design Halloween line this year.  To create this fun banner, I used the scallop circle cards from their card line, patterned paper, twine and lots of lovely coordinating embellishments.  I love this line because it is so kid friendly.  Lots of cute characters for the kids to enjoy.

To make this banner on your own, you will want to make 6 pennant pockets.  You can get 2 pockets out of each piece of 12X12 paper, so you will need three sheets.  Download the PAPER PENNANT TEMPLATE here.  Cut and fold the pennants and then adhere them together so that you have a pocket to put treats in.  Punch a hole in each corner to thread your ribbon or twine through.  Add numbers as desired for a countdown.  You can download the numbers for all of my projects here.
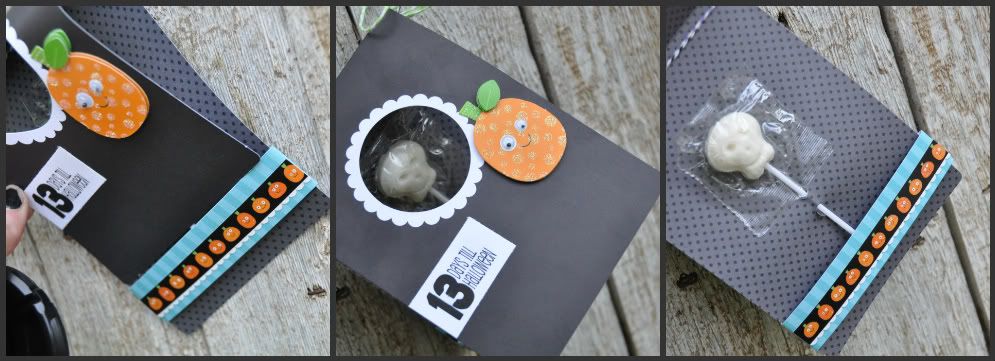
To create the sucker flap, wrap a strip of paper around the open base of the card.  Adhere the strip in the back.  Place your sucker so that it fits directly in the card opening and then punch two holes along the sucker stick so that you can weave it through the card. Decorate the front of the card as desired. Punch holes in either side of the back of the card and tie them onto your banner.

Alternate cards and pennants to create a fun and colorful banner.  Stuff each pennant with treats and goodies for the kids to get to each day.

FRANKIE LOVES CANDY-

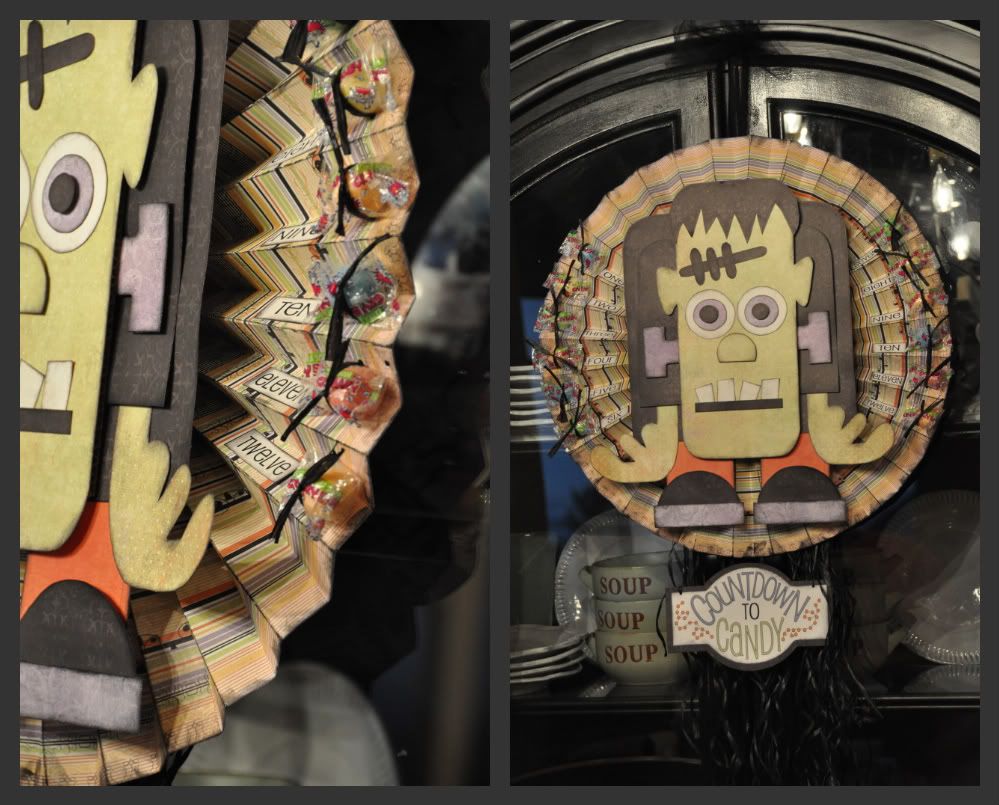
You already know that I am FRANKIE crazy!  I switched up my FRANKIE KIT a little to include a countdown to candy!  You can still purchase either the kit or pattern only for this fun little monster, but it will now include the numbers and sign to make your kit into a countdown for the same price!  Kits will ship out for FREE within 24 hours of purchase!

If you would like to see the tutorial on the accordian circle, visit my circus segment here. (This tutorial also comes in the kit and pattern)

VINTAGE FLIP FRAME-
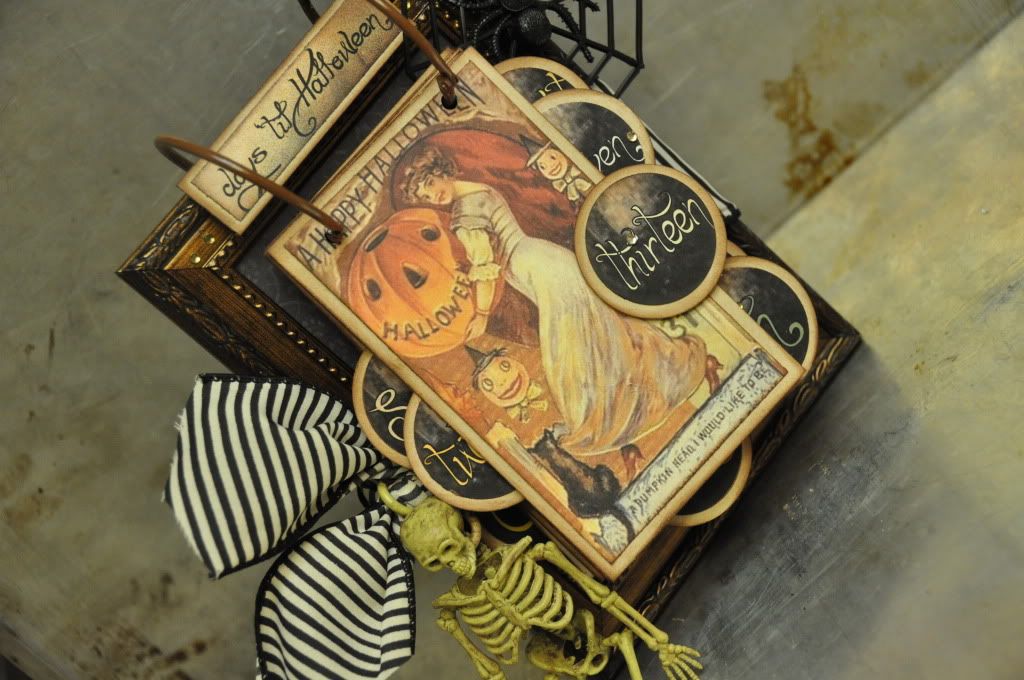
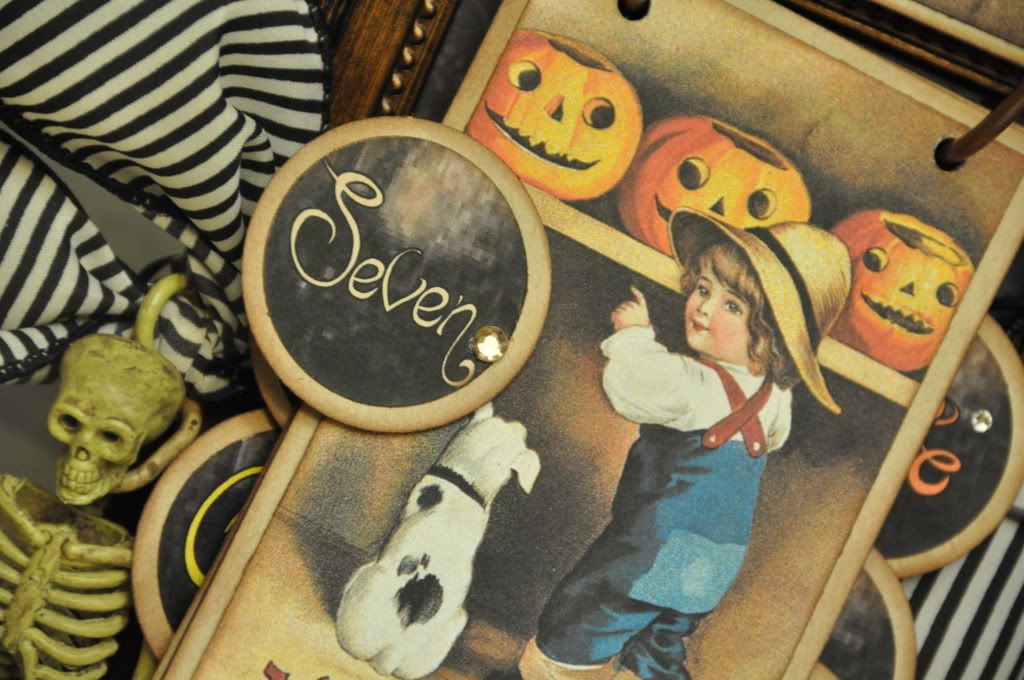
I guess I will always be a bit of a vintage junkie!  I was inspired with a similar flip frame that I saw on Little Birdie Secrets and of course I had try a version of my own. This countdown is sooooooo easy to make, you can whip it out in just an hour.  All you need is a dollar store 4x6 frame, my FREE PRINTABLE DOWNLOAD, two 3" rings, a hole punch (I used my Cropadile) and you are good to go!  To view detailed instructions and photos of the process, download the instruction sheet here.

POCKET FULL OF CANDY-
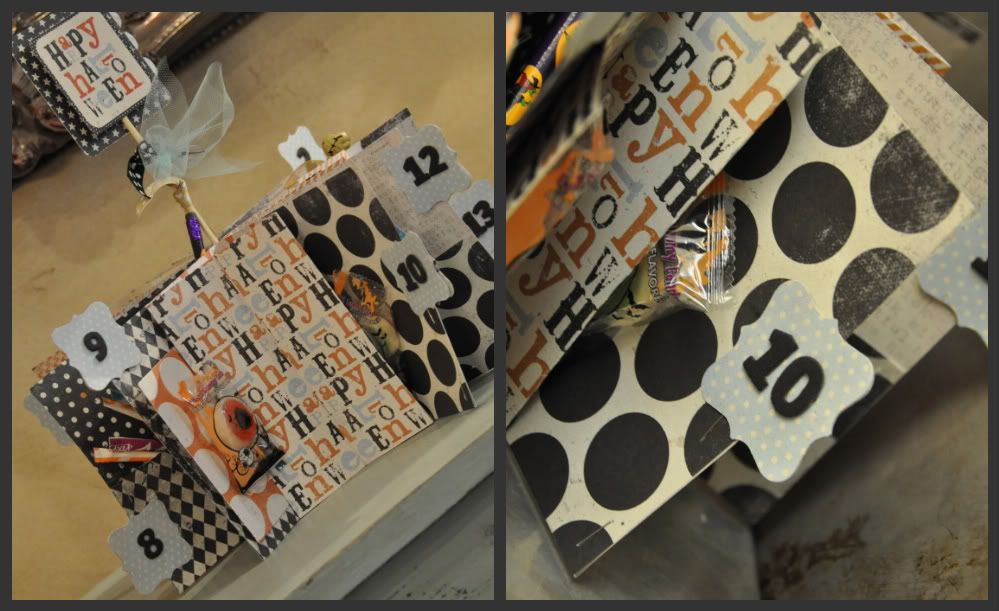
I created this countdown using the classic Star Book Pattern idea with a little twist.  Instead of just making pages, I folded each sheet of paper to create a pocket.  Because this project is a little more instruction intense, I will be posting a full tutorial tomorrow at the latest.  Sorry for the delay, but I promise, it will be worth the wait!

Countdown to Halloween on Studio 5

It's that time once again to COUNTDOWN TO HALLOWEEN!  You may be thinking, aren't you a week late to start counting down October? Well, this year, I decided to switch things up a bit and countdown 13 spooky days to the ghoulish holiday. By doing the unlucky 13 days, you aren't counting down a full 31, which gets a little bit long for the little ones. And, the best part is, you don't have to start counting down until October 18th, so you have plenty of time to complete these projects.

This year, I created 5 different countdowns that are sure to bring the spirit of Halloween straight into your home.  I hope you enjoy the patterns and instructions below.

MAD ABOUT ENVELOPES-
I created this haunted countdown using the new black and orange envelopes from Doodlebug Design. I love these envelopes because they are the perfect colors and they have an adorable rounded scallop flap that really adds to the countdown.  Although these envelopes were perfect for my creation, you can use any envelope that has a top flap.  To embellish the envelopes I used pattern paper and embellishments from Teresa Collins' Haunted Hallows line.

I adhered patterned paper to the front of each envelope and then attached envelopes together so that flaps were open and easy to access. To reinforce the adhesive, I sewed along the edges of the envelopes, being careful not to sew the flaps closed.  (If you don't have access to a sewing machine, you can add a few staples along the edge).  For a fun decorative look, you can sew or staple strips of folded ribbon into the edges as well.

PENNANT POCKETS AND SUCKER FLIP BANNER-


I am obviously loving the Doodlebug Design Halloween line this year.  To create this fun banner, I used the scallop circle cards from their card line, patterned paper, twine and lots of lovely coordinating embellishments.  I love this line because it is so kid friendly.  Lots of cute characters for the kids to enjoy.

To make this banner on your own, you will want to make 6 pennant pockets.  You can get 2 pockets out of each piece of 12X12 paper, so you will need three sheets.  Download the PAPER PENNANT TEMPLATE here.  Cut and fold the pennants and then adhere them together so that you have a pocket to put treats in.  Punch a hole in each corner to thread your ribbon or twine through.  Add numbers as desired for a countdown.  You can download the numbers for all of my projects here.
To create the sucker flap, wrap a strip of paper around the open base of the card.  Adhere the strip in the back.  Place your sucker so that it fits directly in the card opening and then punch two holes along the sucker stick so that you can weave it through the card. Decorate the front of the card as desired. Punch holes in either side of the back of the card and tie them onto your banner.

Alternate cards and pennants to create a fun and colorful banner.  Stuff each pennant with treats and goodies for the kids to get to each day.

FRANKIE LOVES CANDY-

You already know that I am FRANKIE crazy!  I switched up my FRANKIE KIT a little to include a countdown to candy!  You can still purchase either the kit or pattern only for this fun little monster, but it will now include the numbers and sign to make your kit into a countdown for the same price!  Kits will ship out for FREE within 24 hours of purchase!

If you would like to see the tutorial on the accordian circle, visit my circus segment here. (This tutorial also comes in the kit and pattern)

VINTAGE FLIP FRAME-
I guess I will always be a bit of a vintage junkie!  I was inspired with a similar flip frame that I saw on Little Birdie Secrets and of course I had try a version of my own. This countdown is sooooooo easy to make, you can whip it out in just an hour.  All you need is a dollar store 4x6 frame, my FREE PRINTABLE DOWNLOAD, two 3" rings, a hole punch (I used my Cropadile) and you are good to go!  To view detailed instructions and photos of the process, download the instruction sheet here.

POCKET FULL OF CANDY-
I created this countdown using the classic Star Book Pattern idea with a little twist.  Instead of just making pages, I folded each sheet of paper to create a pocket.  Because this project is a little more instruction intense, I will be posting a full tutorial tomorrow at the latest.  Sorry for the delay, but I promise, it will be worth the wait!
Saturday, September 24, 2011

I Love FRANKIE!

Halloween is quickly approaching and if you are like me, you are ready to start crafting and decorating.

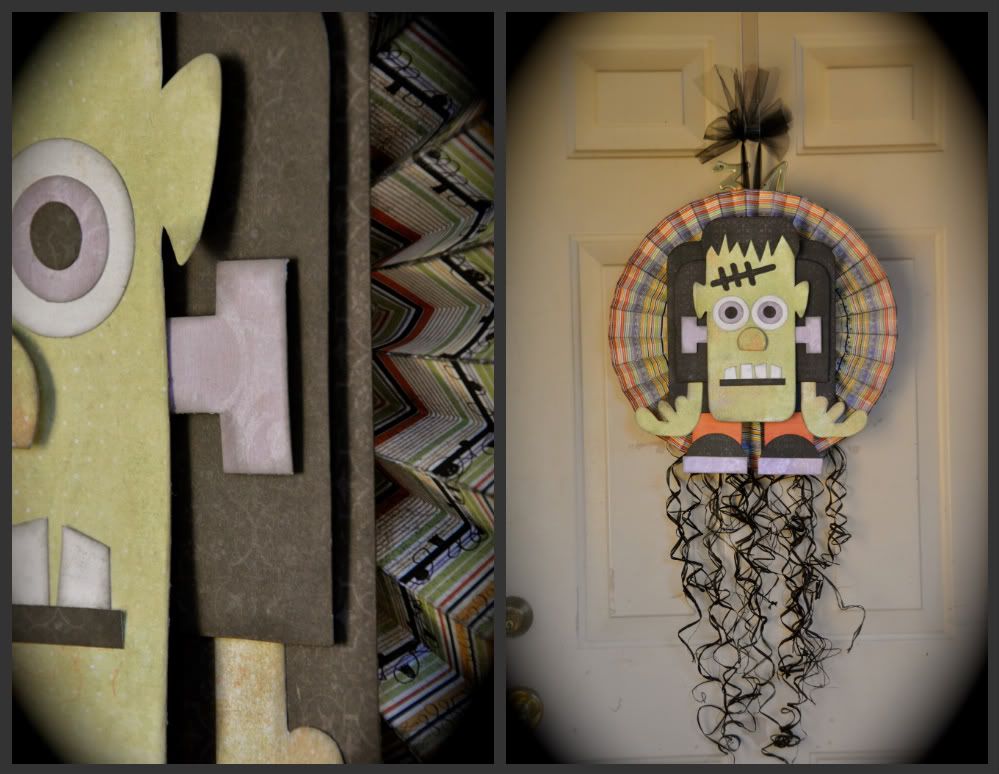
I am so excited to introduce you to FRANKIE!  Frankenstein is one of my favorite Halloween characters and I have loved crafting with him over the years.  This version of Frankie is roughly 16X16 when he is complete so he makes a great door hanger or wall decoration.  He is very simple to assemble and create.

I would love to share him with you.  You can make FRANKIE part of your home decor by purchasing the piecing pattern and selecting your own supplies.  Or, if you need a quick time saver and love him just the way he is, you can purchase the I LOVE FRANKIE KIT, which includes all of the supplies you need to recreate my version along with instructions and patterns. Kits will begin shipping this Monday, September 26th, so you will have plenty of time to display him before the 31st.  Kits are limited and are available first come first serve, so snatch yours ASAP.

Purchase the FRANKIE PATTERN Here
$4 (patterns will be emailed within 24 hours)
Pattern includes color photos of project, instructions and cutting pattern.

Purchase the complete I LOVE FRANKIE KIT here
NOW $15 regularly $22 (includes FREE SHIPPING to all US addresses)


Kits include: 7 Sheets of Fancy Pants Patterned Paper, 1-12X12 Chip Backer, 1-10x10 Chip Backer, 1-5X10 Chip Backer, 20 yards of raffia, 2 yards of tulle, Color photo, instructions, cardstock pattern

Wishing you a Happy, Wonderful, Beautiful Fall!!!!

I Love FRANKIE!

Halloween is quickly approaching and if you are like me, you are ready to start crafting and decorating.

I am so excited to introduce you to FRANKIE!  Frankenstein is one of my favorite Halloween characters and I have loved crafting with him over the years.  This version of Frankie is roughly 16X16 when he is complete so he makes a great door hanger or wall decoration.  He is very simple to assemble and create.

I would love to share him with you.  You can make FRANKIE part of your home decor by purchasing the piecing pattern and selecting your own supplies.  Or, if you need a quick time saver and love him just the way he is, you can purchase the I LOVE FRANKIE KIT, which includes all of the supplies you need to recreate my version along with instructions and patterns. Kits will begin shipping this Monday, September 26th, so you will have plenty of time to display him before the 31st.  Kits are limited and are available first come first serve, so snatch yours ASAP.

Purchase the FRANKIE PATTERN Here
$4 (patterns will be emailed within 24 hours)
Pattern includes color photos of project, instructions and cutting pattern.

Purchase the complete I LOVE FRANKIE KIT here
NOW $15 regularly $22 (includes FREE SHIPPING to all US addresses)


Kits include: 7 Sheets of Fancy Pants Patterned Paper, 1-12X12 Chip Backer, 1-10x10 Chip Backer, 1-5X10 Chip Backer, 20 yards of raffia, 2 yards of tulle, Color photo, instructions, cardstock pattern

Wishing you a Happy, Wonderful, Beautiful Fall!!!!

Wednesday, September 21, 2011

Counting Down to Halloween!

Oh, how I love Halloween!  I have just started my spooky crafting and I am very excited!  I have also been craving the marshmallow pumpkins that are now in all the stores.

In the spirit of Halloween, I thought I would give you a sneak peek at my first haunted craft that will be available as a kit on Saturday.  These kits will be shipping out first thing on Monday morning and are definitely limited, so be sure to get your order in early Saturday.
Any guesses as to what I am concocting?  I promise it is a Halloween decoration fit for any ghoul or goblin!

Counting Down to Halloween!

Oh, how I love Halloween!  I have just started my spooky crafting and I am very excited!  I have also been craving the marshmallow pumpkins that are now in all the stores.

In the spirit of Halloween, I thought I would give you a sneak peek at my first haunted craft that will be available as a kit on Saturday.  These kits will be shipping out first thing on Monday morning and are definitely limited, so be sure to get your order in early Saturday.
Any guesses as to what I am concocting?  I promise it is a Halloween decoration fit for any ghoul or goblin!

Tuesday, September 20, 2011

Menu Board Update

For all of those that were interested in purchasing a menu board kit, they are now available!  Wahoo!  You can purchase kits by contacting Honeyville Farms at 801-972-2168.  The kits are $32 and come with everything you need to complete the kit (you provide adhesive and tools like scissors).  If you are interested, you can also join us for class this Saturday, September 24th from 10-12 where we will be assembling the kits. I am definitely looking forward to seeing some old friends and crafting up a storm! 

Menu Board Update

For all of those that were interested in purchasing a menu board kit, they are now available!  Wahoo!  You can purchase kits by contacting Honeyville Farms at 801-972-2168.  The kits are $32 and come with everything you need to complete the kit (you provide adhesive and tools like scissors).  If you are interested, you can also join us for class this Saturday, September 24th from 10-12 where we will be assembling the kits. I am definitely looking forward to seeing some old friends and crafting up a storm! 

Tuesday, August 9, 2011

Exciting News

A few weeks ago I was contacted by a fabulous food storage company about teaching a class on the magnet menu board that I created last year.  I designed two different color waves and I am very excited to share them with you.  We are still working on all of the final details, but the class will be taught in late September at Honeyville Farms in Salt Lake.  Of course, kits will also be available.  More details to follow soon.  For now, a few pictures to wet your pallet!

If you already know you are interested in getting a kit or taking the class, feel free to leave a comment on the post or contact me and I will send you info as soon as I have all the details.

Exciting News

A few weeks ago I was contacted by a fabulous food storage company about teaching a class on the magnet menu board that I created last year.  I designed two different color waves and I am very excited to share them with you.  We are still working on all of the final details, but the class will be taught in late September at Honeyville Farms in Salt Lake.  Of course, kits will also be available.  More details to follow soon.  For now, a few pictures to wet your pallet!

If you already know you are interested in getting a kit or taking the class, feel free to leave a comment on the post or contact me and I will send you info as soon as I have all the details.

Saturday, May 14, 2011

Summer Card Kit $15(FREE SHIPPING)

I happened to be in a card making mood today.  After I made several bright, summery cards, I thought it might be fun to offer them as a kit.
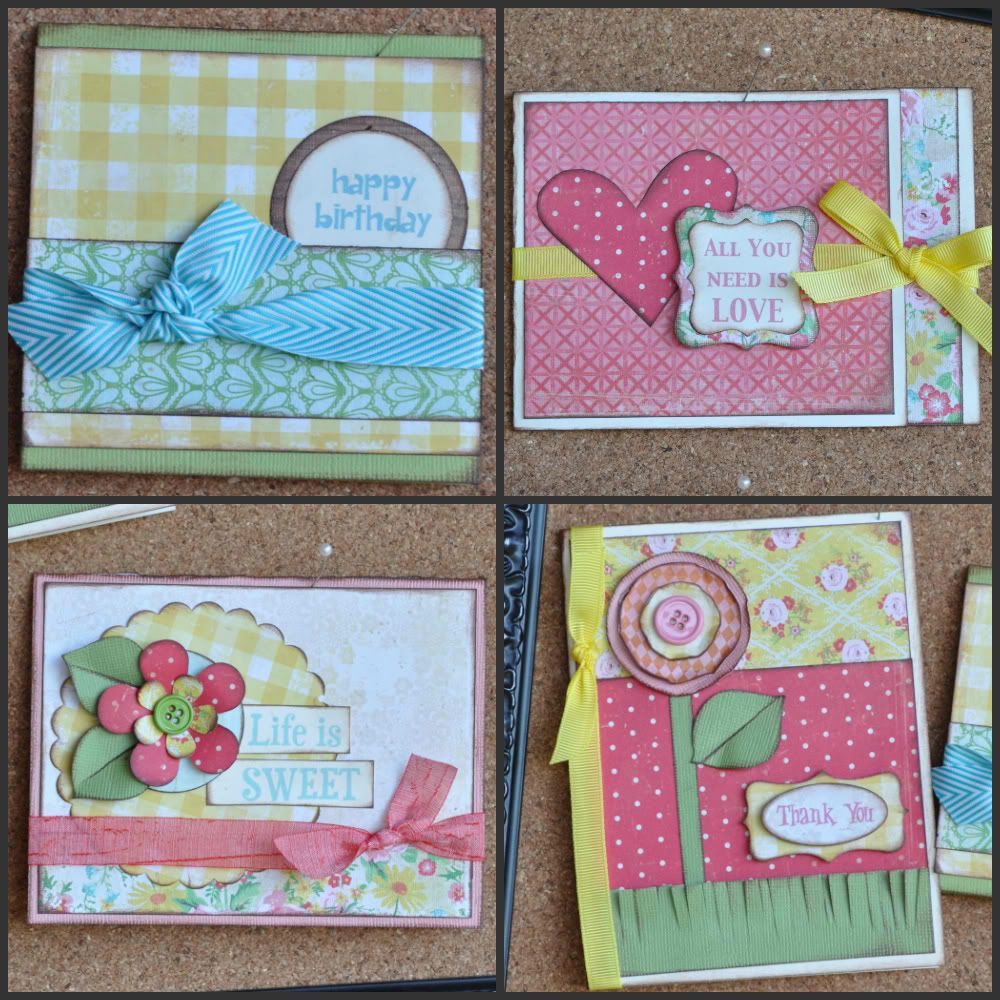
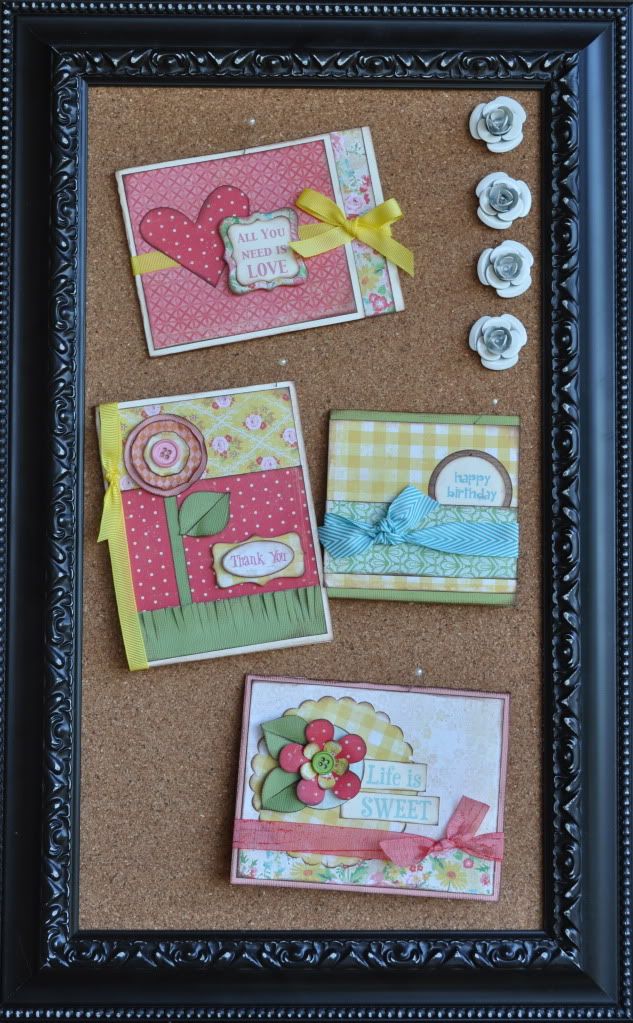
This kit comes with everything you need (cut to size of course) to make these 4 cheery greetings.  You will also get 4 envelopes along with your cards.  As always, you will get color pictures and instructions so that you can easily assemble your creations.

This complete kit is only $15 and it will ship directly to your doorstep for FREE! (US Only).  Kits are limited to the first 12 paid orders, so order now to be sure you get on the list.  Kits will start shipping Tuesday, May 17th.  Any orders placed after May 17th will ship out within 24 hours.

Summer Card Kit $15(FREE SHIPPING)

I happened to be in a card making mood today.  After I made several bright, summery cards, I thought it might be fun to offer them as a kit.

This kit comes with everything you need (cut to size of course) to make these 4 cheery greetings.  You will also get 4 envelopes along with your cards.  As always, you will get color pictures and instructions so that you can easily assemble your creations.

This complete kit is only $15 and it will ship directly to your doorstep for FREE! (US Only).  Kits are limited to the first 12 paid orders, so order now to be sure you get on the list.  Kits will start shipping Tuesday, May 17th.  Any orders placed after May 17th will ship out within 24 hours.