Showing posts with label Baby. Show all posts

Wednesday, July 6, 2011

Spinning through SUMMER!

Today, I must admit, I am thinking about anything to keep my mind off of the fact that my air conditioning is still not in working order! My thought process has gone something like this:
Sweat---Heat---Summer---Outside---Bright Colors---Blowing to cool off---Pinwheels!

I think pinwheels are such a fun project for kids old and young alike. They are super easy to make and can really dress up a centerpiece at a summer party.  Check out a few of my favorite online pinwheel finds:
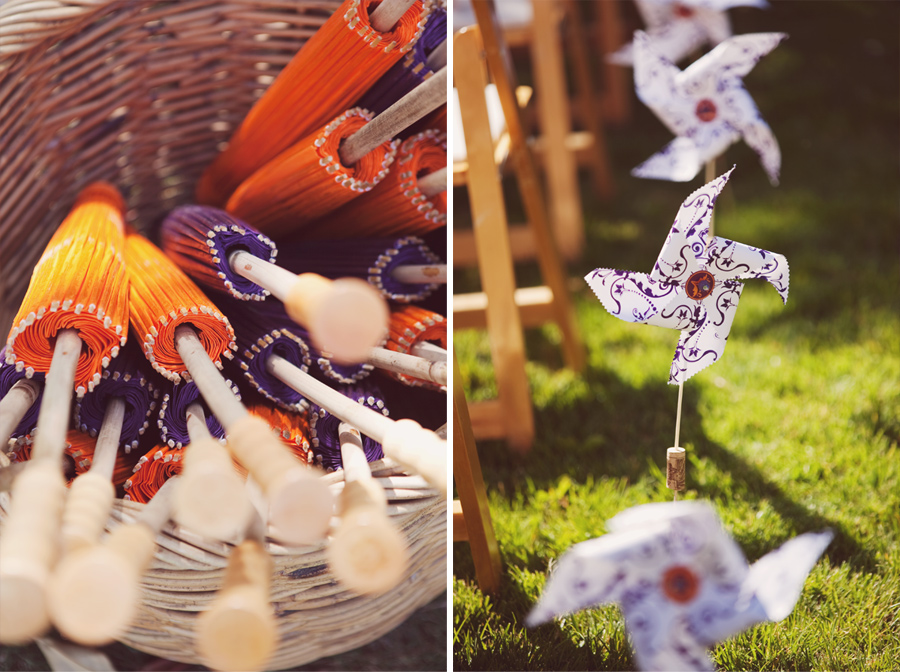
My mind started spinning when I saw the above photo from www.norman-photography.com.  What a fabulous idea for outdoor party decorating. These particular pinwheels were used as favors for a wedding.  How cute would this same idea be for a baby shower or neighborhood BBQ?
I love that this pinwheel was created using two pieces of coordinating paper.  This pinwheel is definitely a step up from your basic square pattern, but it is still very doable.  I found this little sweetie at http://paperexploits.wordpress.com.

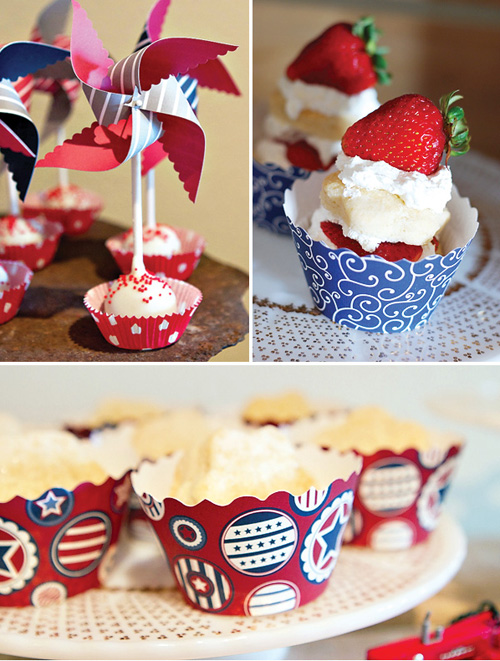
How about a little mini pinwheel for finishing off a fluffy cupcake?  I love the idea of using miniature versions for food decor.  Pinwheels would be great in cakes or even stuck in bowls of popcorn or salad.  This idea came from http://www.pepperdesignblog.com.
I can't think of a happier way to line a path than with a row of cheerful pinwheels.  Lead your guests to your event by sticking handmade pinwheels intermittently along the walkway. Thanks to www.thecheshirekat.com for sharing this fun idea.

Now that we are all feeling inspired to start crafting up pinwheels of our own, here are a few sites that offer downloadable templates.  Remember to get creative with the templates by changing the size and even shape of your cuts.

For a very basic pinwheel:

For amazing instructions on creating a little more advanced pinwheel, visit http://www.heatherbailey.com/Pinwheel.pdf.

Spinning through SUMMER!

Today, I must admit, I am thinking about anything to keep my mind off of the fact that my air conditioning is still not in working order! My thought process has gone something like this:
Sweat---Heat---Summer---Outside---Bright Colors---Blowing to cool off---Pinwheels!

I think pinwheels are such a fun project for kids old and young alike. They are super easy to make and can really dress up a centerpiece at a summer party.  Check out a few of my favorite online pinwheel finds:
My mind started spinning when I saw the above photo from www.norman-photography.com.  What a fabulous idea for outdoor party decorating. These particular pinwheels were used as favors for a wedding.  How cute would this same idea be for a baby shower or neighborhood BBQ?
I love that this pinwheel was created using two pieces of coordinating paper.  This pinwheel is definitely a step up from your basic square pattern, but it is still very doable.  I found this little sweetie at http://paperexploits.wordpress.com.

How about a little mini pinwheel for finishing off a fluffy cupcake?  I love the idea of using miniature versions for food decor.  Pinwheels would be great in cakes or even stuck in bowls of popcorn or salad.  This idea came from http://www.pepperdesignblog.com.
I can't think of a happier way to line a path than with a row of cheerful pinwheels.  Lead your guests to your event by sticking handmade pinwheels intermittently along the walkway. Thanks to www.thecheshirekat.com for sharing this fun idea.

Now that we are all feeling inspired to start crafting up pinwheels of our own, here are a few sites that offer downloadable templates.  Remember to get creative with the templates by changing the size and even shape of your cuts.

For a very basic pinwheel:

For amazing instructions on creating a little more advanced pinwheel, visit http://www.heatherbailey.com/Pinwheel.pdf.

Friday, April 22, 2011

The Circus Comes to Town!-Part 1

Designing for a party always makes me anxious to play hostess!  The circus theme is especially fun because it can be incorporated into so many different events..baby, birthday, summer fun. I really enjoyed crafting up these "Big Top" creations.  I am always amazed at what patterned paper can do to create a mood and theme.  For these ideas, I used two unique lines to style two completely different circus themed parties. I hope you enjoy these fun ideas that can be transformed into many different themes.

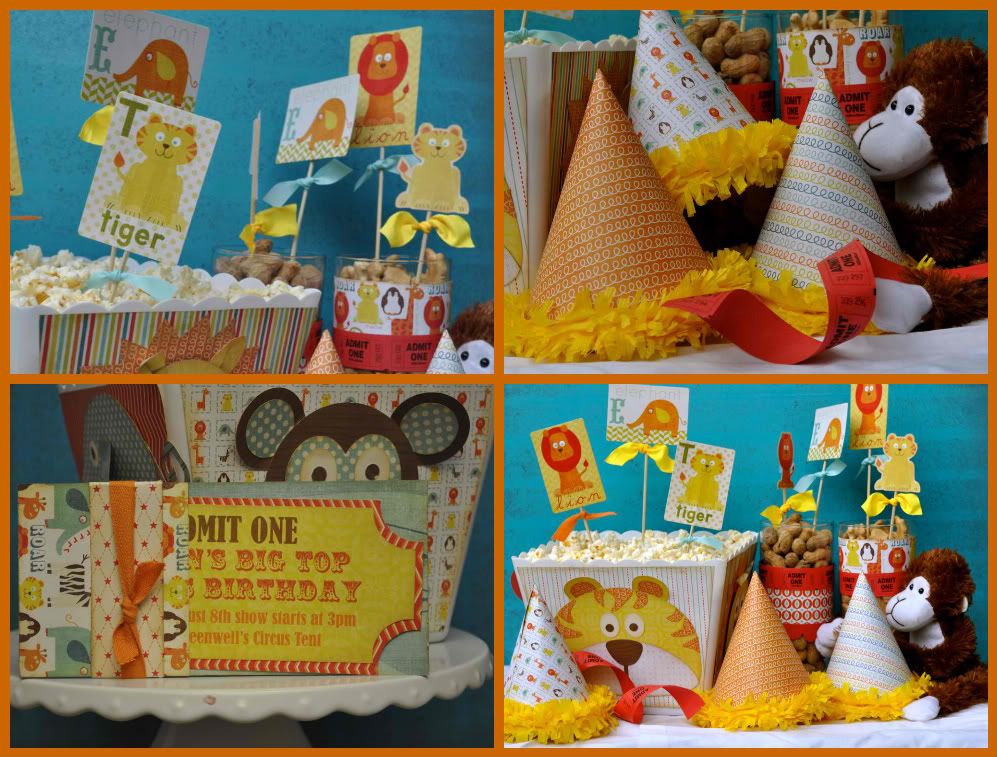
This first party section is all about the kiddos.  I used the adorable Alphabet Soup line from My Mind's Eye to craft up these circus animal creations.  I love the bright colors that really bring home the circus feel.
All of the decorative picks were created using the preprinted playing cards and die-cuts from the Alphabet Soup line. Just attach each shape to a BBQ skewer using a little adhesive, tie a ribbon and you are set to go.  Skewers are a great way to add height and color to a centerpiece with very little expense

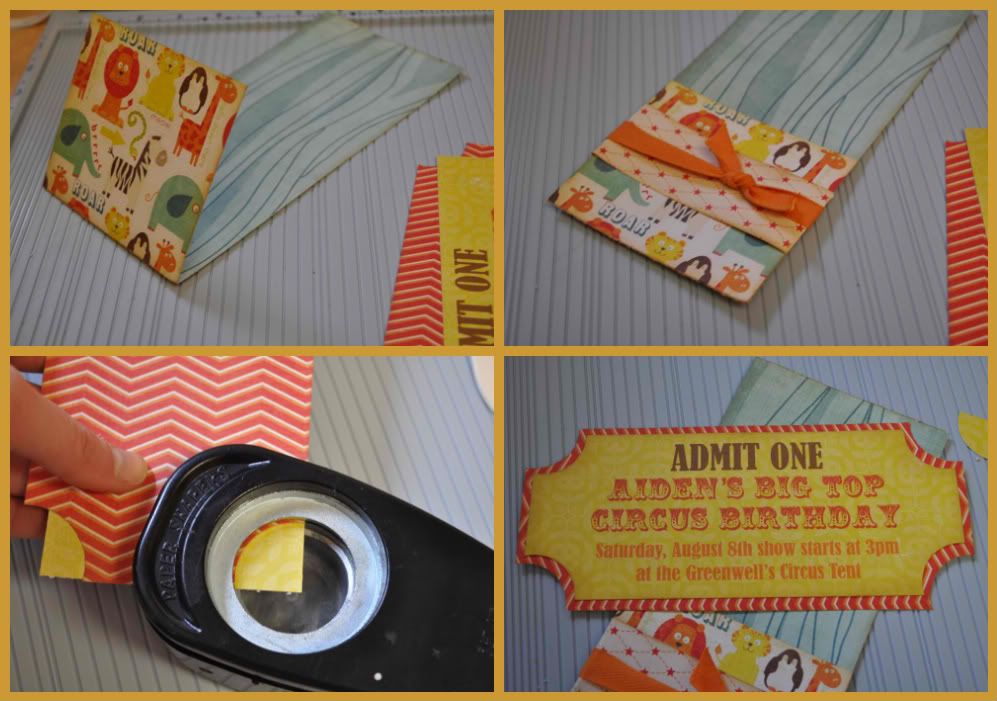
Every good party starts with a great invitation.  This simple invite is one of my favorites (with a little added circus ticket twist)
To recreate this invitation envelope:
1. Cut a 4" strip from a 12X12 double sided patterned paper (you will get three invitations per piece)
2. Use your scor-pal (or scoring blade on your paper cutter) to scor and fold 3.5" from the bottom of the paper.
3. Wrap a strip of patterned paper or ribbon around the folded paper to secure it.
4. Tuck invitation in pocket.

The ticket shape is easy to create using a large circle punch as shown in the picture.
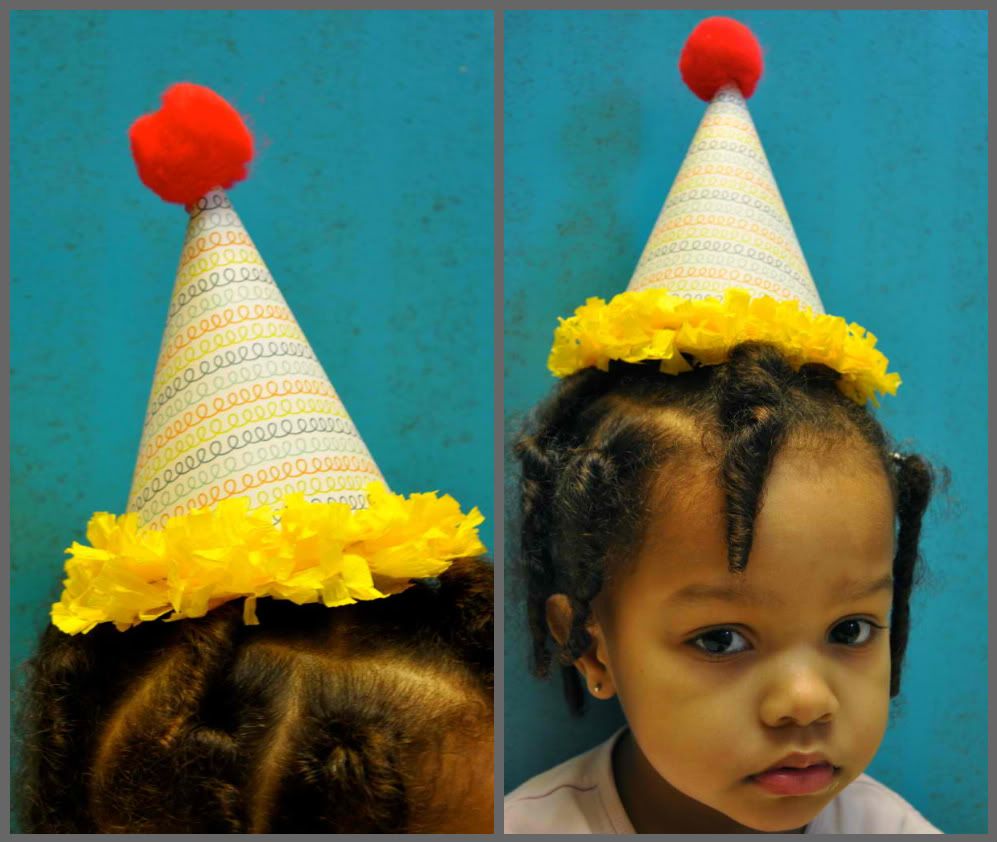
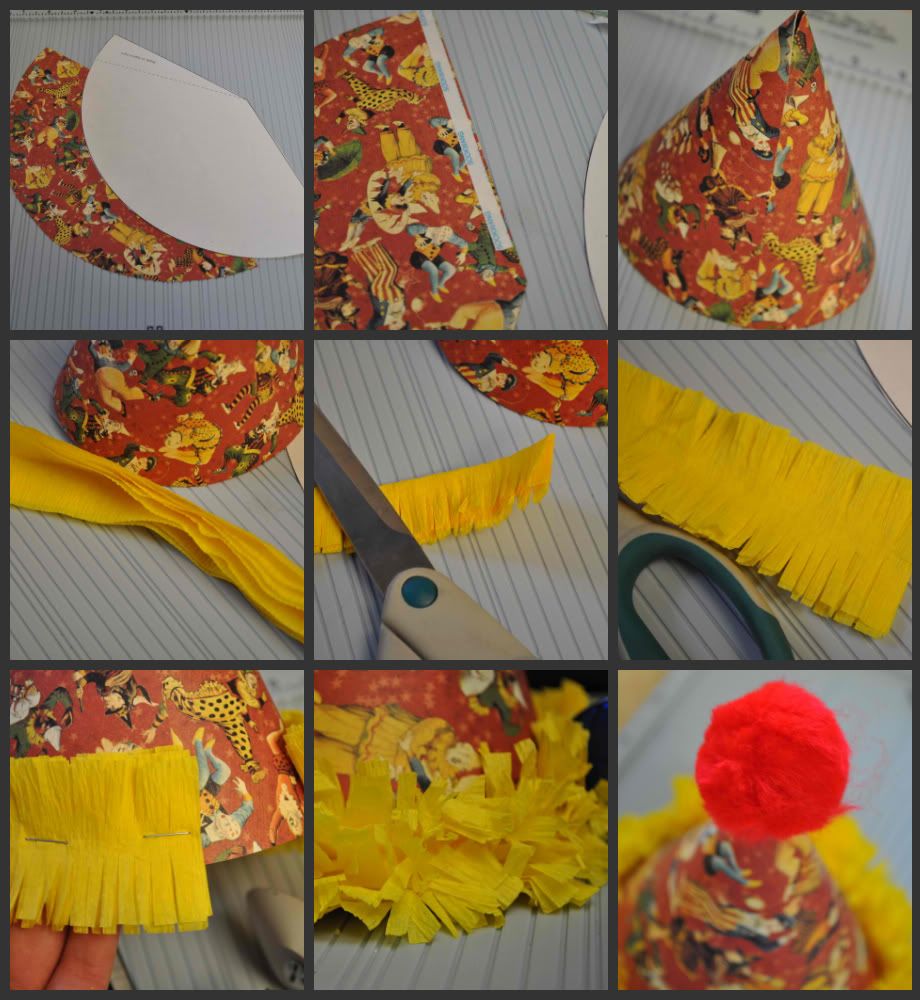
No party is complete without a party hat!  It is so simple to create custom party hats to fit your parties theme. You can generally make 2 hats out of 1 12X12 piece of patterned paper.  I added a little crate paper flair and a fuzzy red ball to top it off.

To make your own custom hats:
1. Download and print the party hat template
2. Trace the template onto your patterned paper and cut out
3. Apply adhesive (I used and loved scor-tape) as shown in template.
4. Fold hat and adhere as shown in template
5. Measure 4-6 lengths of crate paper to go around the hat's rim.
6. Fold layers in half and snip with scissors to create a fringed edge.
7. Open up folded strips and staple onto rim of hat.
8. Crinkle crate paper until it hides staples.
9. Hot glue a fuzzy ball to the tip of the hat.
10. Add elastic string or ribbon to hold onto head as desired.

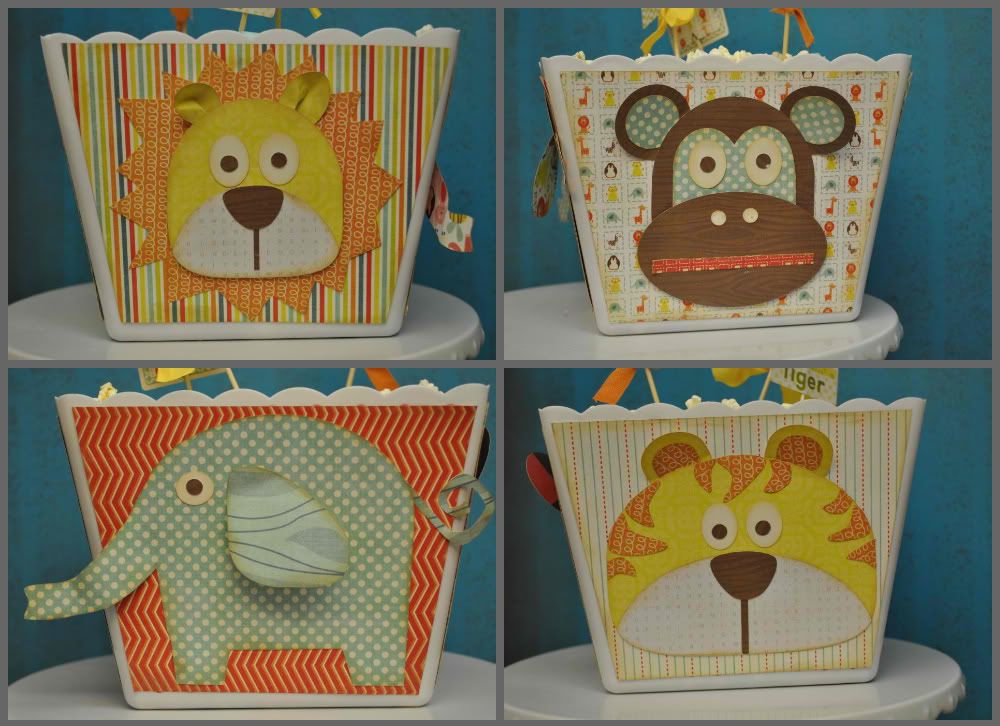
A centerpiece brings the party theme to your table.  I know that I have really been on a popcorn kick lately, but it is just so inexpensive and easy to do.  To create this circus animal centerpiece, I paper pieced 4 different animals and adhered them to each side of a popcorn bin (gotta love the dollar store)! You can do so many fun different things with these pieced animals.  They would be adorable hanging on a wall or door in a child's room or classroom.  As a bonus to my favorite Studio 5'ers, I am posting the template downloads free until May 1st.  So, download them quick before they vanish!
Elenor the Elephant
Leo the Lion Part 1
Leo the Lion Part 2
Mel the Monkey
Thomas the Tiger Part 1
Thomas the Tiger Part 2

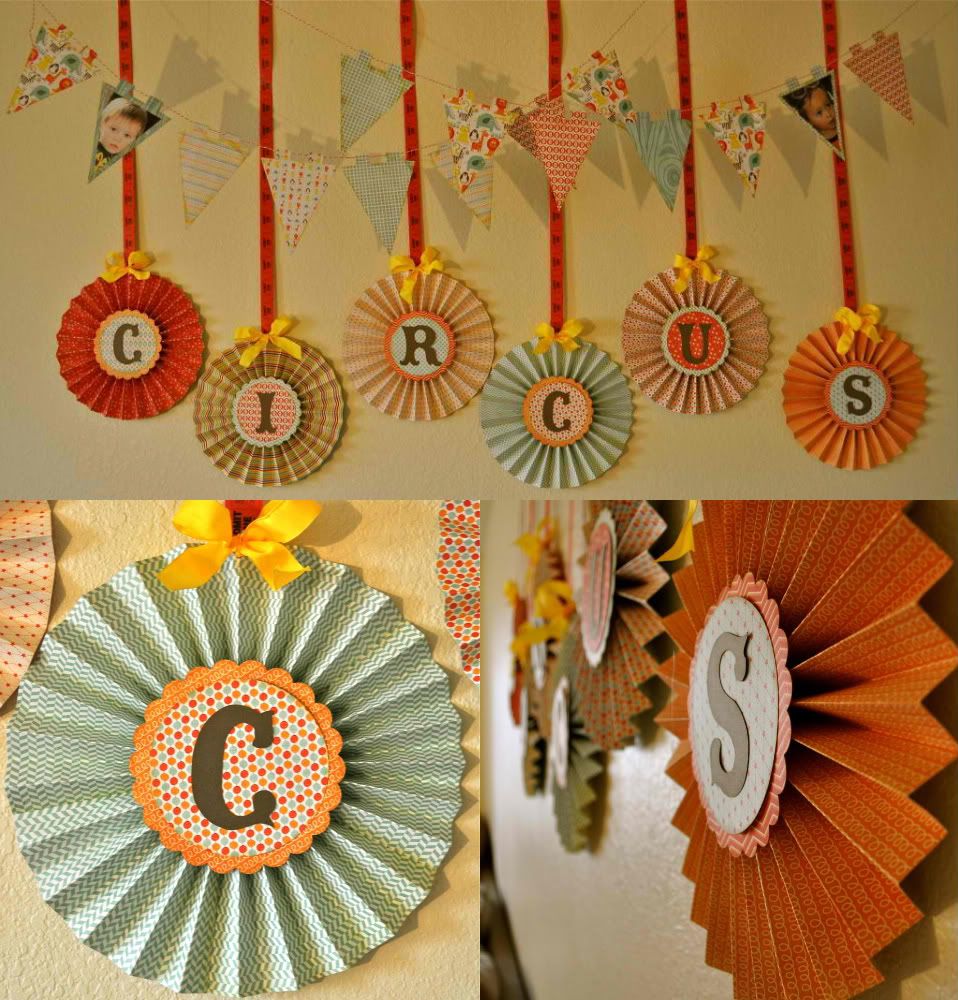
A banner is a fool proof way to scream party!  I love using banners to dress up dull walls that seem to large to tackle with anything else.  I especially love the vintage accordion banner because it fits perfectly with the circus theme. These little pieces are some of my favorites for dressing up my art. I love to make them in all different sizes.  In fact, I used the same pattern to create lots of the clown creations you will see in part 2!

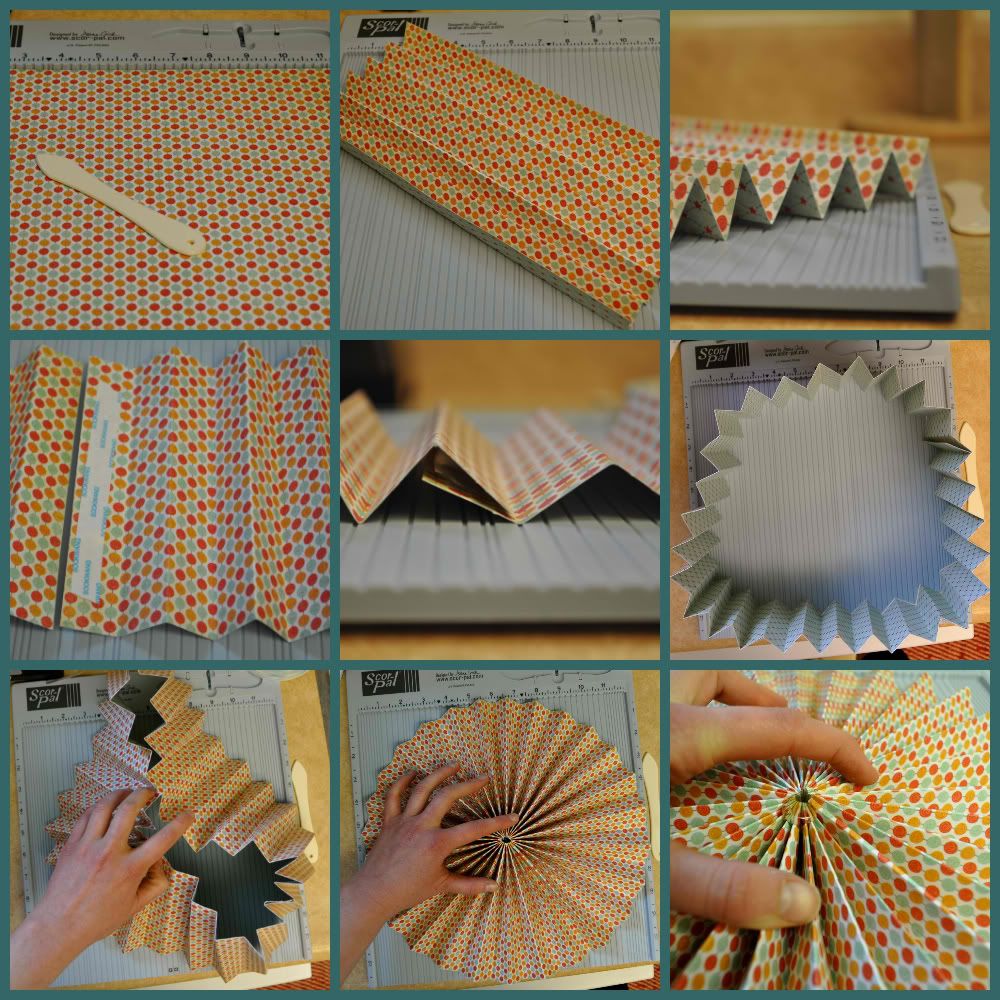
Here is a simple how to for creating the accordion folded pieces: (these are the instructions for creating the large 12X12 pieces, but keep in mind that you can make all different sizes by changing the size of your paper strips and the width of your fold)

1. I like to scor a complete 12X12 sheet before I cut it into strips. This saves time in scoring.  Using your Scor-Pal, scor your paper in 1" intervals alternating front and back side so the folds go back and forth.
2. Cut your paper across the scors at 6"(this will leave you with a 6"X12" strip.
3. Repeat process until you have 5 strips (2.5 sheets of paper).
4. Adhere strips together using strong adhesive (gotta love the scor tape).
5. Adhere two ends together to create a ring.
6. Press ring down so that it fans out.
7. Use hot glue in the center of the fan to adhere it all together.

To the accordions, I added circles and letters.  I then hung each piece using the rolled tickets that are available at office stores.  To adhere the tickets, I punched a hole in the top of the accordion and tied the tickets on with ribbon.

The Circus Comes to Town!-Part 1

Designing for a party always makes me anxious to play hostess!  The circus theme is especially fun because it can be incorporated into so many different events..baby, birthday, summer fun. I really enjoyed crafting up these "Big Top" creations.  I am always amazed at what patterned paper can do to create a mood and theme.  For these ideas, I used two unique lines to style two completely different circus themed parties. I hope you enjoy these fun ideas that can be transformed into many different themes.

This first party section is all about the kiddos.  I used the adorable Alphabet Soup line from My Mind's Eye to craft up these circus animal creations.  I love the bright colors that really bring home the circus feel.
All of the decorative picks were created using the preprinted playing cards and die-cuts from the Alphabet Soup line. Just attach each shape to a BBQ skewer using a little adhesive, tie a ribbon and you are set to go.  Skewers are a great way to add height and color to a centerpiece with very little expense

Every good party starts with a great invitation.  This simple invite is one of my favorites (with a little added circus ticket twist)
To recreate this invitation envelope:
1. Cut a 4" strip from a 12X12 double sided patterned paper (you will get three invitations per piece)
2. Use your scor-pal (or scoring blade on your paper cutter) to scor and fold 3.5" from the bottom of the paper.
3. Wrap a strip of patterned paper or ribbon around the folded paper to secure it.
4. Tuck invitation in pocket.

The ticket shape is easy to create using a large circle punch as shown in the picture.
No party is complete without a party hat!  It is so simple to create custom party hats to fit your parties theme. You can generally make 2 hats out of 1 12X12 piece of patterned paper.  I added a little crate paper flair and a fuzzy red ball to top it off.

To make your own custom hats:
1. Download and print the party hat template
2. Trace the template onto your patterned paper and cut out
3. Apply adhesive (I used and loved scor-tape) as shown in template.
4. Fold hat and adhere as shown in template
5. Measure 4-6 lengths of crate paper to go around the hat's rim.
6. Fold layers in half and snip with scissors to create a fringed edge.
7. Open up folded strips and staple onto rim of hat.
8. Crinkle crate paper until it hides staples.
9. Hot glue a fuzzy ball to the tip of the hat.
10. Add elastic string or ribbon to hold onto head as desired.

A centerpiece brings the party theme to your table.  I know that I have really been on a popcorn kick lately, but it is just so inexpensive and easy to do.  To create this circus animal centerpiece, I paper pieced 4 different animals and adhered them to each side of a popcorn bin (gotta love the dollar store)! You can do so many fun different things with these pieced animals.  They would be adorable hanging on a wall or door in a child's room or classroom.  As a bonus to my favorite Studio 5'ers, I am posting the template downloads free until May 1st.  So, download them quick before they vanish!
Elenor the Elephant
Leo the Lion Part 1
Leo the Lion Part 2
Mel the Monkey
Thomas the Tiger Part 1
Thomas the Tiger Part 2

A banner is a fool proof way to scream party!  I love using banners to dress up dull walls that seem to large to tackle with anything else.  I especially love the vintage accordion banner because it fits perfectly with the circus theme. These little pieces are some of my favorites for dressing up my art. I love to make them in all different sizes.  In fact, I used the same pattern to create lots of the clown creations you will see in part 2!

Here is a simple how to for creating the accordion folded pieces: (these are the instructions for creating the large 12X12 pieces, but keep in mind that you can make all different sizes by changing the size of your paper strips and the width of your fold)

1. I like to scor a complete 12X12 sheet before I cut it into strips. This saves time in scoring.  Using your Scor-Pal, scor your paper in 1" intervals alternating front and back side so the folds go back and forth.
2. Cut your paper across the scors at 6"(this will leave you with a 6"X12" strip.
3. Repeat process until you have 5 strips (2.5 sheets of paper).
4. Adhere strips together using strong adhesive (gotta love the scor tape).
5. Adhere two ends together to create a ring.
6. Press ring down so that it fans out.
7. Use hot glue in the center of the fan to adhere it all together.

To the accordions, I added circles and letters.  I then hung each piece using the rolled tickets that are available at office stores.  To adhere the tickets, I punched a hole in the top of the accordion and tied the tickets on with ribbon.
Tuesday, April 12, 2011

Studio 5 Baby Shower Favors


I had so much fun crafting up these sweet little favors.  I made them specifically with a baby shower in mind, but they could easily be changed up to work for weddings, Easter, or any other special occasion. All of these favors were created using the new lines from Crate Paper, which I have already mentioned my love for!  I hope you enjoy the photos and instructions for the projects below!

Easy Scor-Pal Treat Holder:
I used my beloved Scor-Pal tool to whip up these quick, versatile treat holders. You can see that I created 3 completely different favors from the same basic pattern. These favors are very inexpensive to make and can be filled with a variety of treats.  Get creative with the pattern and make it work for your shower's theme (of course, I had to create an owl one!). Here is the quick how-to for these favors:

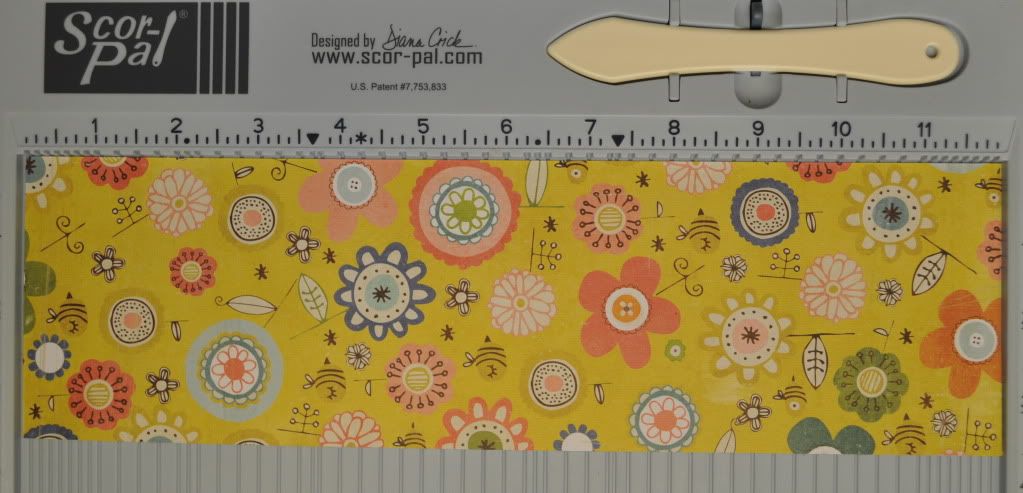
1. Cut 12X12 patterned paper to 3-4" wide (depending on the cellophane bag you are putting inside). I recommend filling the bag and laying it out with a ruler to determine how wide your paper needs to be.
2. Lay your paper horizontally across your Scor-Pal (you can use a paper cutter with a scoring blade, but the Scor-Pal is much easier).
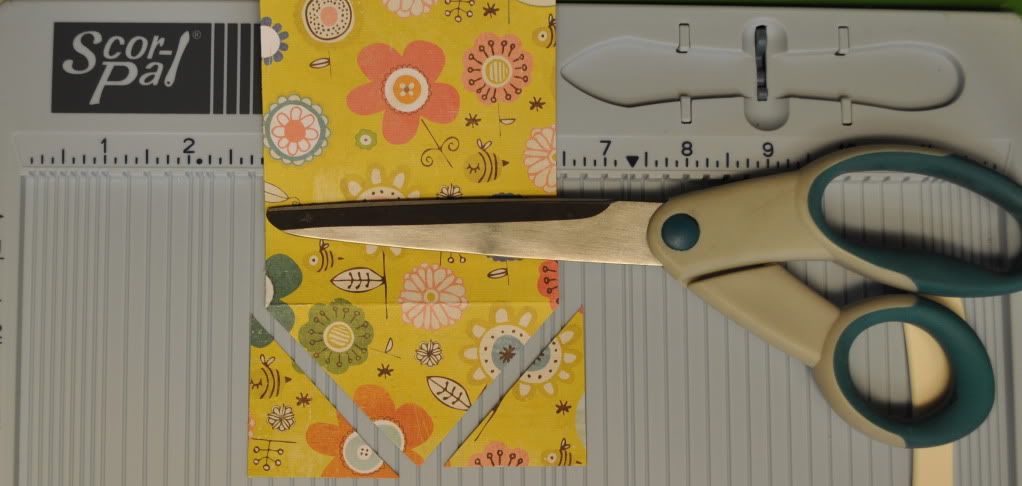
3. Scor your paper at the 2", 6", and 8" marks

4. Find the center point of the short edge and trim it into a triangle with your scissors or paper trimmer.

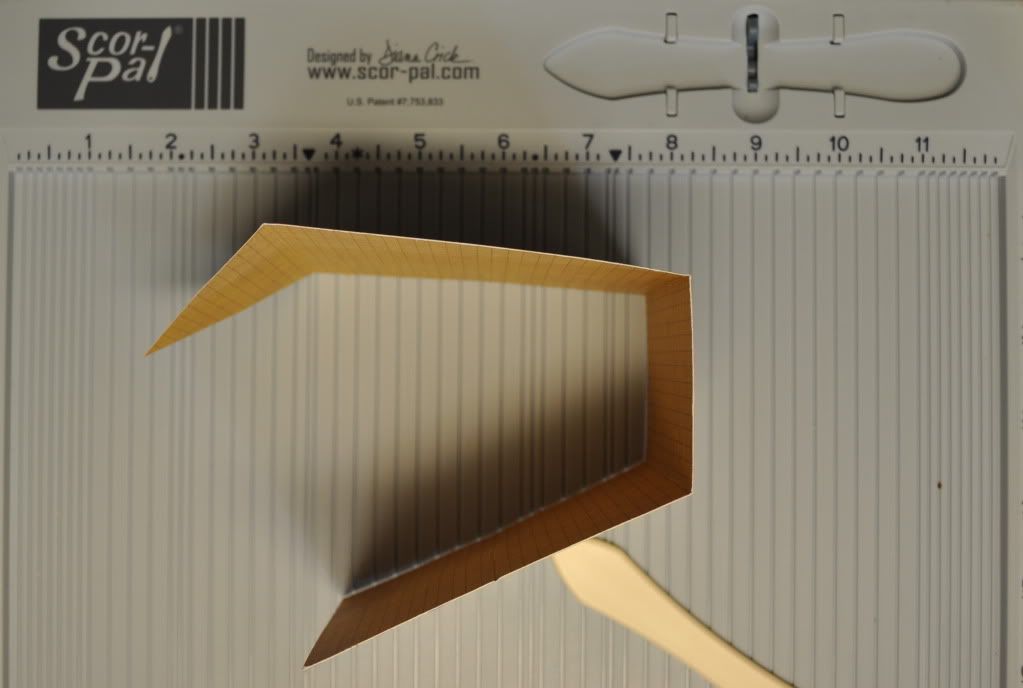
5. Fold the paper along the marks so that it looks like this
Now you are ready to decorate your favor.  You can simply glue it shut or use a ribbon to tie it closed.  You can also add additional decorations to make the favor fit your theme.  Slip your filled cellophane treat bag inside and you are good to go.
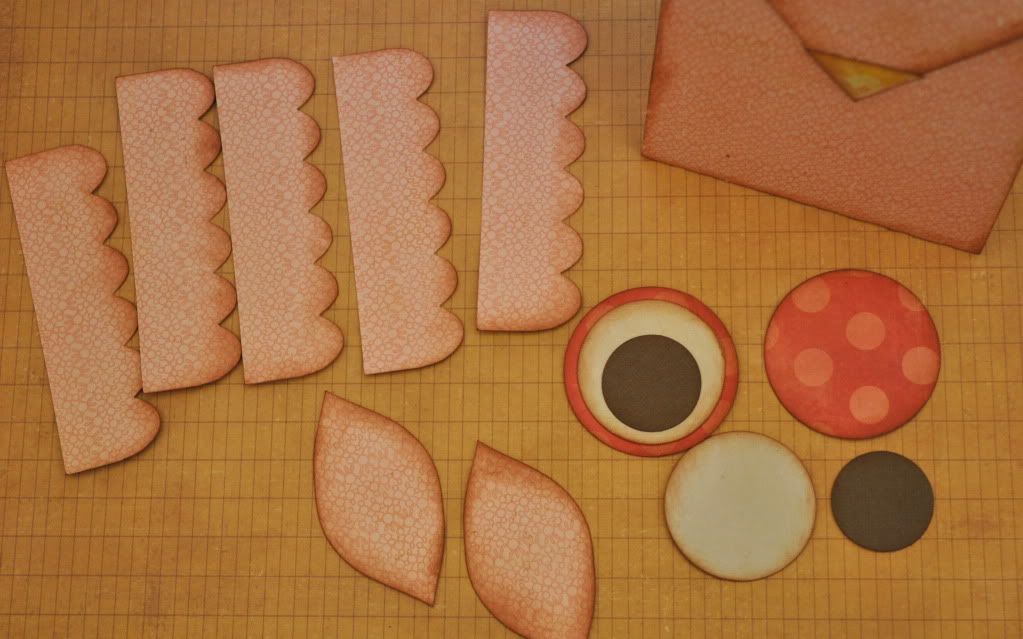
Here is what I added to create the owl:

Popcorn Boxes-FREE PATTERN DOWNLOAD:
There are so many cute sayings for using popcorn at a party or event.  Using popcorn is also fabulous because it can serve a crowd for just a few dollars.  I vamped mine up just a tad by melting a bag of white chocolate chips and pouring it over the popped corn.  You could also do caramel corn for a sweet treat. Some possible sayings for using popcorn are:
"Thanks for Popping By"
"Maryanne is just about ready to Pop!"
"We are so glad he Popped the question!"
You could easily recreate these favors with a simple cellophane bag for serving, but the customized popcorn boxes are just too cute!  I cut these using my Silhouette machine which really made it quick and easy.  If you have a Silhouette machine (lucky you!) you can download the free template here.  You can also cut these out of patterned paper by hand.   Download a pdf pattern to print and cut here.  I have also included a print and cut pdf for the little "Thanks for Popping by" labels.  They can be cut using a 1 3/4" circle punch, or by hand.

Baby Preserves-FREE LABEL DOWNLOAD:
Baby food jars make a perfect container for a shower favor.  I purchased mine at Walmart for $0.46 each. I chose applesauce because I have a great apple cake recipe that can use it all up.  If you have enough time before your shower, you could also order empty jars online.  Once I emptied and washed the jars, I used spray paint to coat the lids to cover up any branding.  I filled the baby girl jars with bubble bath and the boy jars with homemade hot fudge. The hot fudge makes a great filler because you can make it for relatively inexpensive and the brown is so cute!  

To make these jars at home, simply print out the pdf labels here. (I printed mine on a light patterned paper) This is a two page pdf document that has both boy and girl labels on it.  Cut apart the labels, add a little ink on the edges and glue them onto your jars. I also added ribbon to the girl jars for a little extra flair.

Don't forget to include a little sign inviting guests to take a jar and giving them a hint as to what is inside!


Baby Banner Favors FREE TEMPLATE DOWNLOAD:
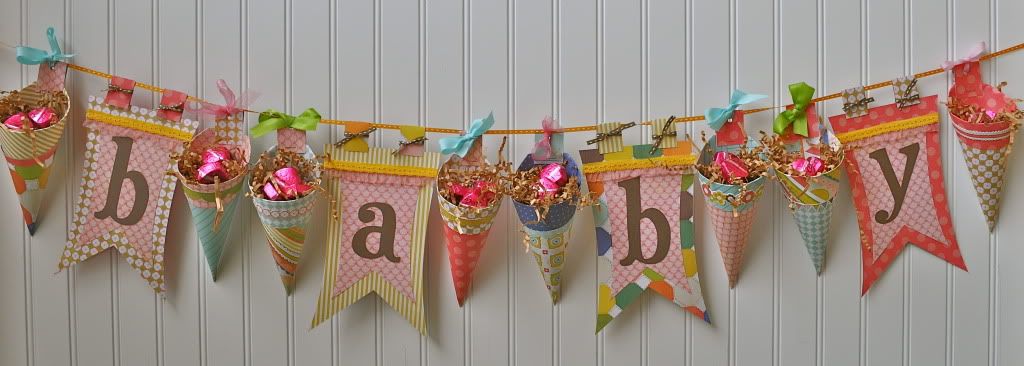
This project is more than just a favor...it is a party favor, a decoration and a gift all in one.  The banner can hang at your party to add color and theme to the event.  Guests can untie a treat cone from the banner and take it home with them.  After the party, you can give the remaining banner to the mommy to be.
You can download the easy print and cut pattern for the banner and cones by clicking here.  Just select paper and ribbon that fit your theme and get to work. I love using Scor-Tape to hold the cones together because it is so strong. To hang the cones from the ribbon, I stapled a small strip of paper to the top and punched a hole for the ribbon. I filled each cone with paper shred and a few yummy treats.

Want it made for you? If you would be interested in having any of my show samples for your next shower, or would like custom created projects, please contact me here for pricing and details.

Studio 5 Baby Shower Favors


I had so much fun crafting up these sweet little favors.  I made them specifically with a baby shower in mind, but they could easily be changed up to work for weddings, Easter, or any other special occasion. All of these favors were created using the new lines from Crate Paper, which I have already mentioned my love for!  I hope you enjoy the photos and instructions for the projects below!

Easy Scor-Pal Treat Holder:
I used my beloved Scor-Pal tool to whip up these quick, versatile treat holders. You can see that I created 3 completely different favors from the same basic pattern. These favors are very inexpensive to make and can be filled with a variety of treats.  Get creative with the pattern and make it work for your shower's theme (of course, I had to create an owl one!). Here is the quick how-to for these favors:

1. Cut 12X12 patterned paper to 3-4" wide (depending on the cellophane bag you are putting inside). I recommend filling the bag and laying it out with a ruler to determine how wide your paper needs to be.
2. Lay your paper horizontally across your Scor-Pal (you can use a paper cutter with a scoring blade, but the Scor-Pal is much easier).
3. Scor your paper at the 2", 6", and 8" marks

4. Find the center point of the short edge and trim it into a triangle with your scissors or paper trimmer.

5. Fold the paper along the marks so that it looks like this
Now you are ready to decorate your favor.  You can simply glue it shut or use a ribbon to tie it closed.  You can also add additional decorations to make the favor fit your theme.  Slip your filled cellophane treat bag inside and you are good to go.
Here is what I added to create the owl:

Popcorn Boxes-FREE PATTERN DOWNLOAD:
There are so many cute sayings for using popcorn at a party or event.  Using popcorn is also fabulous because it can serve a crowd for just a few dollars.  I vamped mine up just a tad by melting a bag of white chocolate chips and pouring it over the popped corn.  You could also do caramel corn for a sweet treat. Some possible sayings for using popcorn are:
"Thanks for Popping By"
"Maryanne is just about ready to Pop!"
"We are so glad he Popped the question!"
You could easily recreate these favors with a simple cellophane bag for serving, but the customized popcorn boxes are just too cute!  I cut these using my Silhouette machine which really made it quick and easy.  If you have a Silhouette machine (lucky you!) you can download the free template here.  You can also cut these out of patterned paper by hand.   Download a pdf pattern to print and cut here.  I have also included a print and cut pdf for the little "Thanks for Popping by" labels.  They can be cut using a 1 3/4" circle punch, or by hand.

Baby Preserves-FREE LABEL DOWNLOAD:
Baby food jars make a perfect container for a shower favor.  I purchased mine at Walmart for $0.46 each. I chose applesauce because I have a great apple cake recipe that can use it all up.  If you have enough time before your shower, you could also order empty jars online.  Once I emptied and washed the jars, I used spray paint to coat the lids to cover up any branding.  I filled the baby girl jars with bubble bath and the boy jars with homemade hot fudge. The hot fudge makes a great filler because you can make it for relatively inexpensive and the brown is so cute!  

To make these jars at home, simply print out the pdf labels here. (I printed mine on a light patterned paper) This is a two page pdf document that has both boy and girl labels on it.  Cut apart the labels, add a little ink on the edges and glue them onto your jars. I also added ribbon to the girl jars for a little extra flair.

Don't forget to include a little sign inviting guests to take a jar and giving them a hint as to what is inside!


Baby Banner Favors FREE TEMPLATE DOWNLOAD:
This project is more than just a favor...it is a party favor, a decoration and a gift all in one.  The banner can hang at your party to add color and theme to the event.  Guests can untie a treat cone from the banner and take it home with them.  After the party, you can give the remaining banner to the mommy to be.
You can download the easy print and cut pattern for the banner and cones by clicking here.  Just select paper and ribbon that fit your theme and get to work. I love using Scor-Tape to hold the cones together because it is so strong. To hang the cones from the ribbon, I stapled a small strip of paper to the top and punched a hole for the ribbon. I filled each cone with paper shred and a few yummy treats.

Want it made for you? If you would be interested in having any of my show samples for your next shower, or would like custom created projects, please contact me here for pricing and details.

Friday, April 8, 2011

Studio 5 Sneak Peek

I have been busily working on Baby Shower Favor Ideas for Studio 5 on Tuesday.  I wanted to give you a sneak peek into one of the fun projects. I love many things about this banner.  One.... it serves as both a decoration and a favor.  Might as well kill two birds with one stone, right? Two... it can be easily changed for a wedding shower or Easter party. For more pictures, detailed instructions and the template be sure to check back on Tuesday.  The show airs in Utah at 11am on KSL, or you can view the segment here after.
Okay, now back to work for me.  I'm still working on a few more ideas to share.

Studio 5 Sneak Peek

I have been busily working on Baby Shower Favor Ideas for Studio 5 on Tuesday.  I wanted to give you a sneak peek into one of the fun projects. I love many things about this banner.  One.... it serves as both a decoration and a favor.  Might as well kill two birds with one stone, right? Two... it can be easily changed for a wedding shower or Easter party. For more pictures, detailed instructions and the template be sure to check back on Tuesday.  The show airs in Utah at 11am on KSL, or you can view the segment here after.
Okay, now back to work for me.  I'm still working on a few more ideas to share.

Friday, September 10, 2010

d.i.y. baby burp cloths

If you can sew a relatively straight line, then you can make these!

Purchase a roll of ribbon from any craft store, there are lots and lots of cute patterned ribbon. At Hobby Lobby they have ribbon that coordinates with fabric if you wan to make a matching baby blanket and burp cloth.

Next, buy a package of cloth baby diapers found at Target, Wal-mart or any store that sells baby clothing.

pin the ribbon on top of the cloth diaper seams and sew. I use transparent thread so that the stitch doesn't compete with the pattern (and it's harder to see if your line isn't so straight, wink-wink).

et voila! You have a darling baby burp cloth that is incredibly durable and most importantly, cute.

I have used these with each of my three children and I love them!

Tuesday, March 2, 2010

goodbye baby moccasins :(

It is a sad day for me and especially for Henry. His feet are much too big for these stylish baby moccasins. My friend Susan made them and they were awesome! When he was just little bitty, they fell off but once his foot grew into them they were a dream come true. Unfortunately I never got a picture of them on, well I did, but it is on my mac laptop which died a couple of months ago.

Anyhow we say farewell to you and hope that baby Phil (Henry's younger cousin) will love them as much as we did. ps if any of you moms out there want one of your own for your wee one, you can bye them here at Freshly Picked.

Monday, February 22, 2010

highchair before & after


I got this highchair when Max was born 6 years ago. I love it because it is sturdy, simple and doesn't have the cheesiness that many high chairs do with the ruffles and animal print. But it is definitely dated, so I thought why not reupholster it (in a sense)?

I had this fabric handy, I wasn't going to use it for any other projects and it's pretty subdued, just black and white. I cut 2 rectangles, one small one for the seat and one large one for the back. Nothing exact, just enough to wrap around underneath the bottom and back.

I then cut small slits in the fabric so that it would wrap around where the bolts were. When I brought it around the bottom I got a large needle and some quilting thread. I gathered the corners together and sewed them so they were tight and secure. I didn't care that it doesn't look too pretty underneath.

I then bought a yard of clear vinyl overlay for about $2. I did the same thing I did with the fabric but instead of securing it with thread I used a staple gun.

Here is the finished product. It looks great in our dining room and blends in instead of sticking out like a sore thumb. I had to turn the fabric on the back of the chair to make it fit, but I figure I won't notice that, especially when it is covered with spaghetti. :)